You’ll become very familiar with VSCode as you continue to work in codespaces. This is a handy guide to refer to for the important ins-and-outs of using the editor.
We are using the VSCode integrated code editor in this course. Whenever you boot up a fresh codespace, this is the application that you are interacting with to explore your files, Git version control (commit, push, etc.), edit your code, and view your live app preview.
Codespace (VSCode) layout
Whenever you boot up a fresh codespace, Visual Studio Code (a.k.a. VSCode) is the application that you are interacting with.
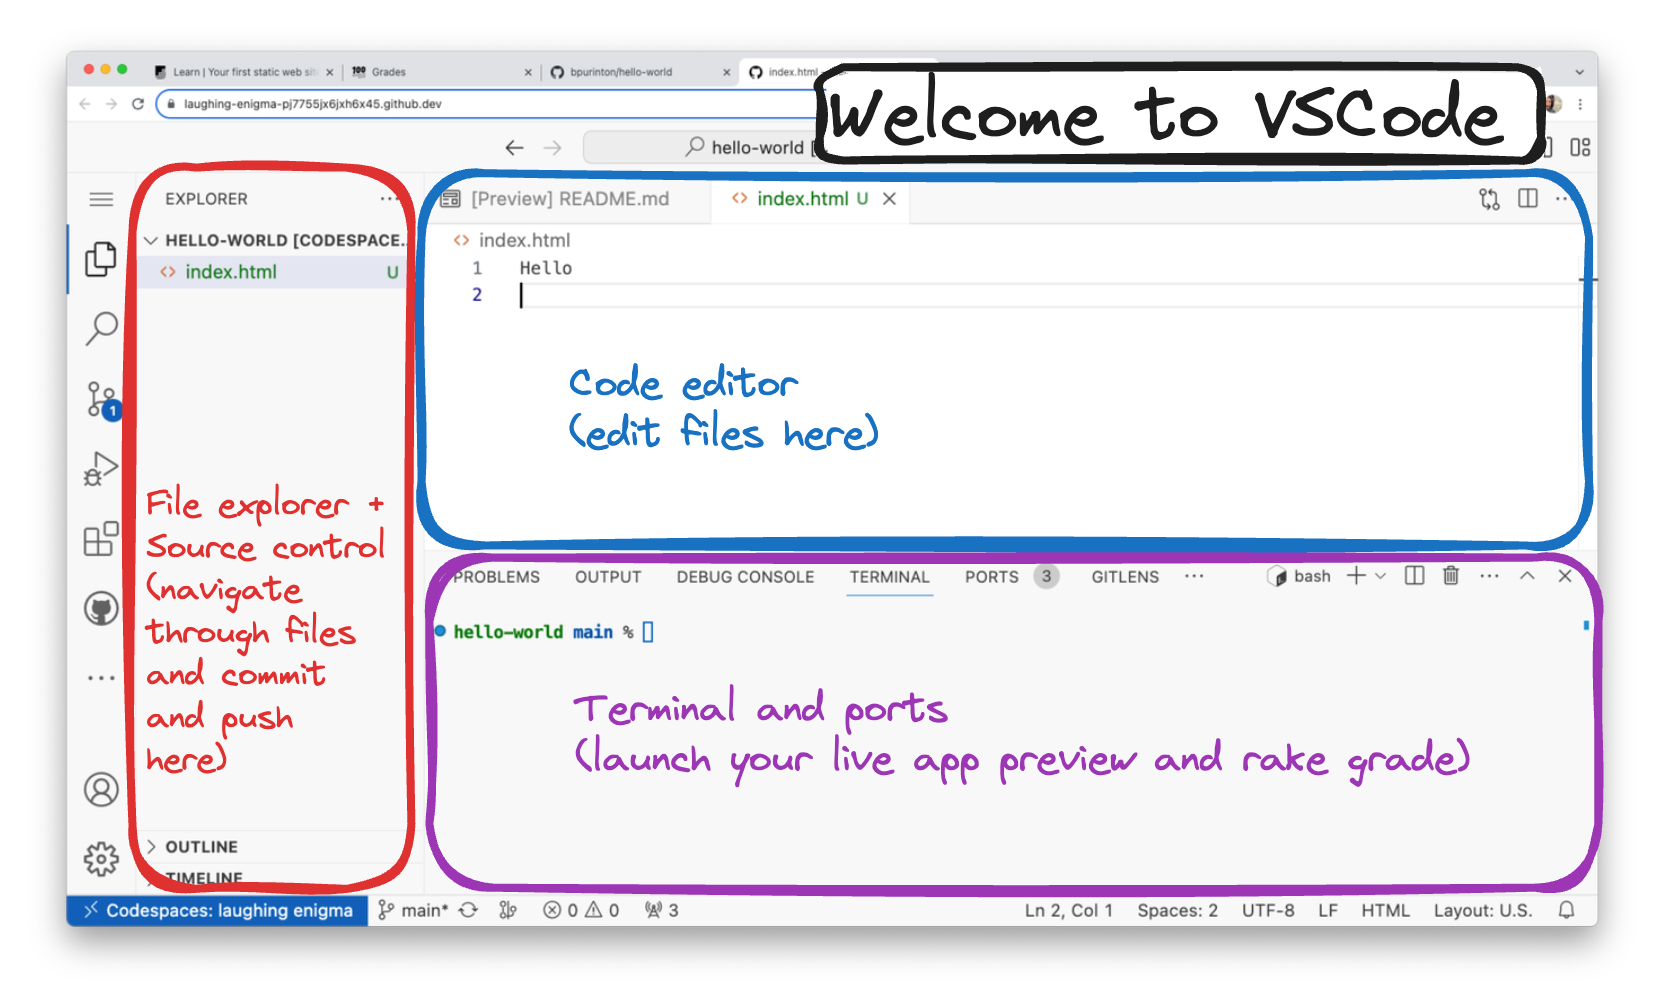
The basic components of the VSCode window are the three panes:
-
the left pane
-
containing the file explorer and source control tabs (where you create and open files and visit your Git version control)
-
-
the top pane
-
containing the code editor tabs (where you type and edit files in your codebase)
-
-
the bottom pane
-
containing the terminal and ports tabs (where you run a live app server on a port with
bin/serverand runrake grade)
-
Reopen a pane
Sometimes you might accidentally close out of the explorer (left pane) or terminal (bottom pane).
To reopen them, there are keyboard shortcuts to close and reopen:
-
Ctrl (Windows) or Cmd (Mac) + B for left pane,
-
Ctrl (Windows) or Cmd (Mac) + J for bottom pane.
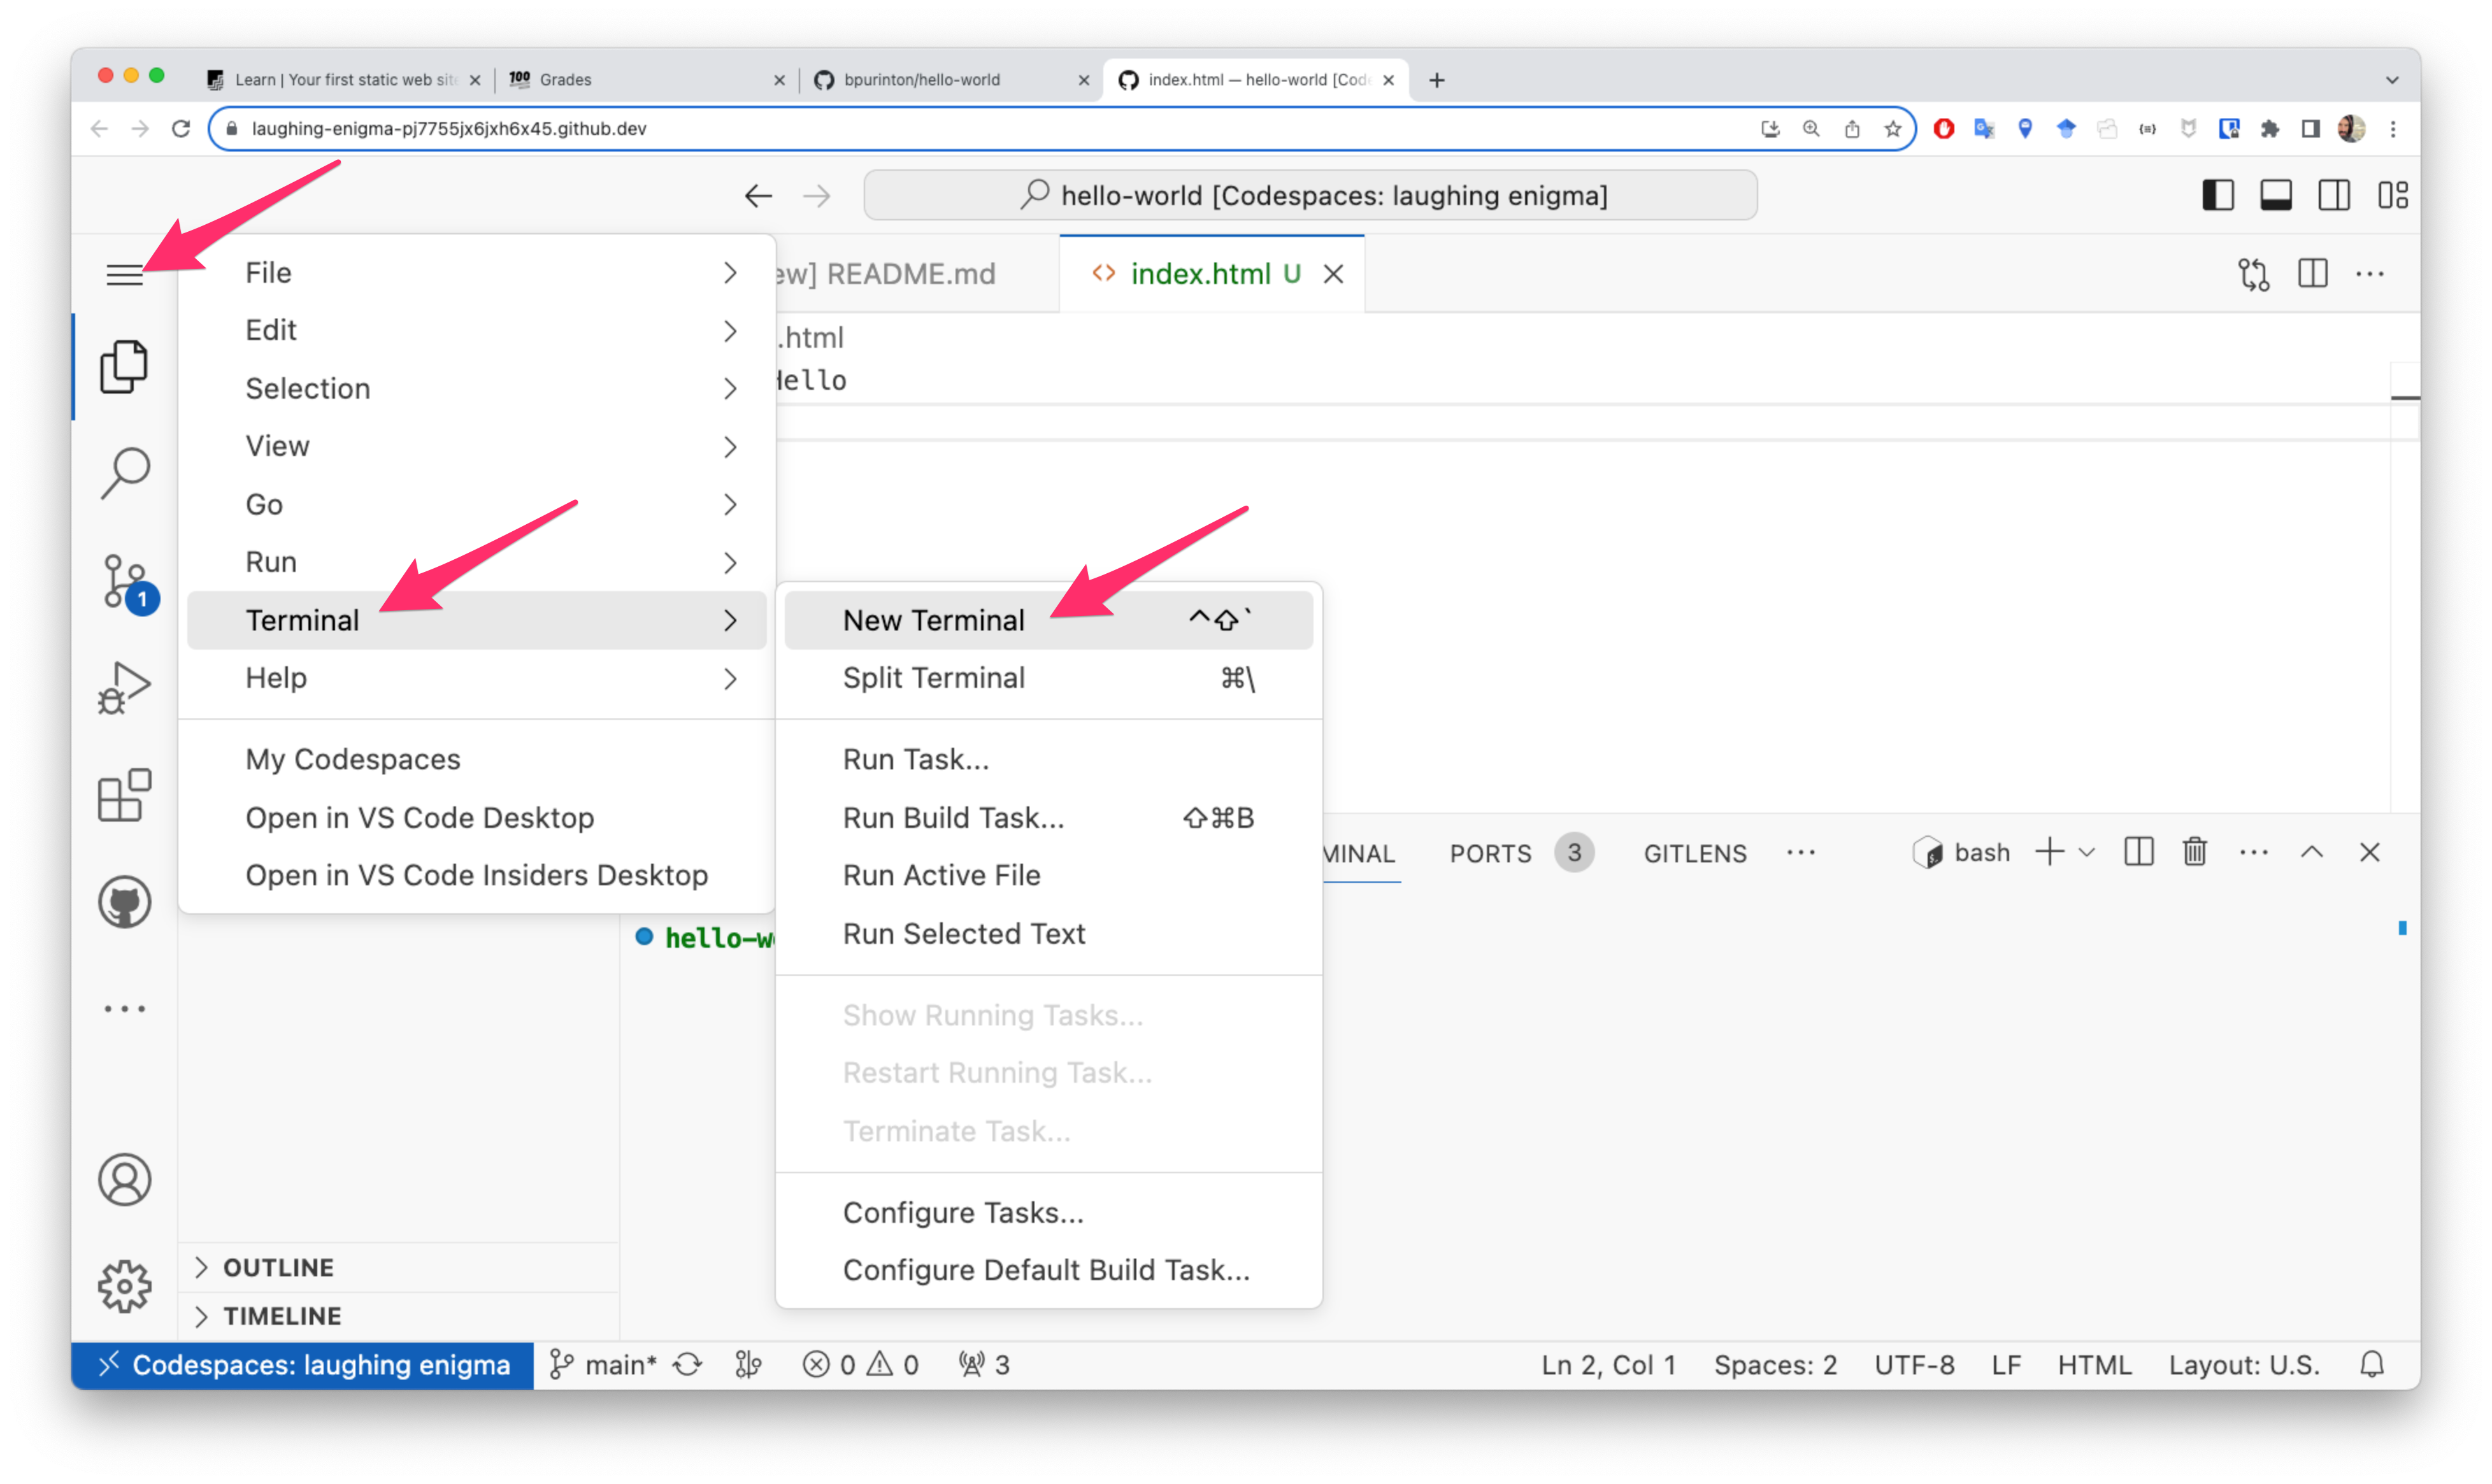
But, you can always click on the top left hamburger menu to bring up the VSCode options and visit “View” to reopen:
The terminal
Let’s discuss the all important terminal integrated into VSCode.
The term “terminal” is a bit squishy, you may also hear it called the command-line, command prompt, or shell, among other terms. In this course, we typically use the term bash prompt since that is the specific terminal program that we are interacting with most often.
All of these usually mean the same thing: A place for you to type commands (“instructions”) to be run by the underlying operating system or coding environment.
The terminal layout
Take a moment to read about the all-important, but perhaps unfamiliar, terminal tab in the bottom pane of the VSCode window.
In the terminal tab, we have:

-
The GitHub repo name.
-
The current git “branch”, or version of the code, that you are on (usually this will be
main). -
The
%sign, or bash prompt.-
bashis a program running at the operating system level that allows you to enter instructions to the computer. -
You may see other styles of command prompt, like a
$or>symbol. If you see one of these symbols at the end of your terminal prompt, it means the terminal can be typed into and new commands can be run.
-
-
A
+button icon for opening additional fresh bash prompts in tabs. -
If you open another bash tab, you will see a navigation pane to click between them.
Server and Ports
I have two bash prompt environments open in the terminal tab (more about terminal environments below). Clicking on the second bash prompt, we see I have bin/server running, which is my live application preview server, running Puma:

Note that we no longer have access to the %-symbol bash prompt, because this terminal is now dedicated to running the live app preview.
If you want to cancel the web server, thus closing your live app preview, and returning you to the bash prompt to enter another command, you can just press:
-
Ctrl + C
That’s a very important command: it will cancel any currently running terminal process if your terminal gets stuck doing something and you want access to the prompt again to enter new commands.
With the live app preview running, to open the live preview in a new browser tab, visit the “Ports” tab in the bottom pane, look for the port with a green dot 🟢 on the left side (indicating that it is active), and hover over the “Local Address” column, then click the globe 🌐 button to “Open in Browser”:
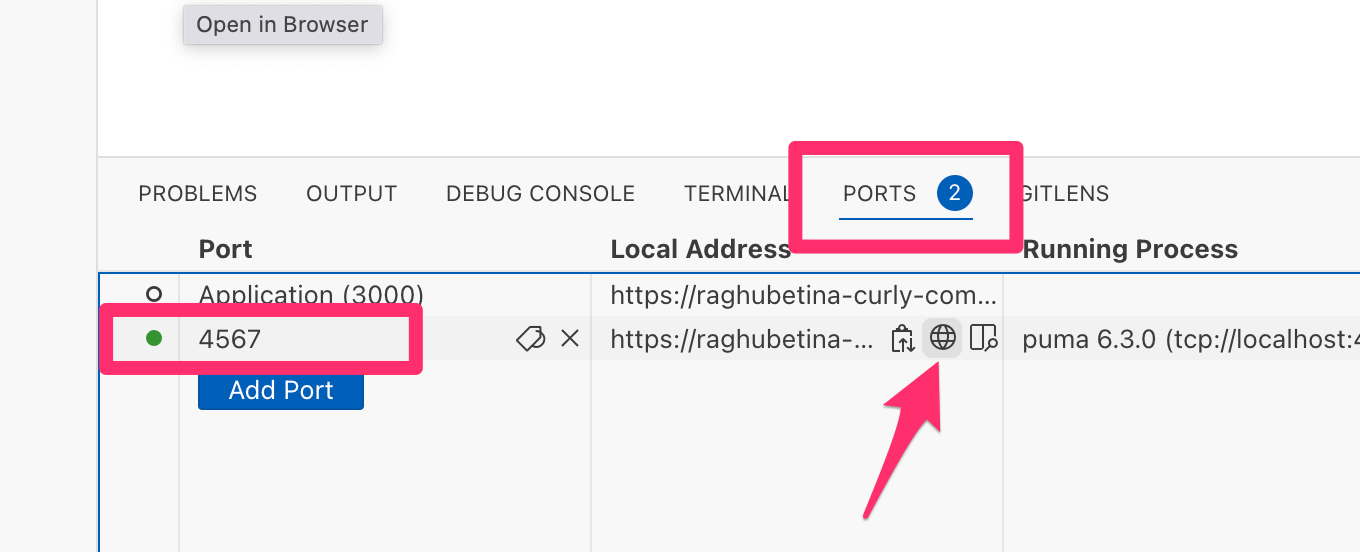
This is very useful if I ever accidentally close the browser tab running the live app preview: Just click this button in the Ports tab to reopen the preview, assuming you have an active web server terminal running.
A note about ports
What is a port exactly?
You can think of a “network port” as something that allows types of programs to run. Or that certain types of programs need to run on a port.
The Puma web server runs on a port (port 3000 by default). This allows us to visit the web application in the browser using the IP Address of the computer plus the port number.
Since we’re working in codespaces (and not running the web server on our own computer), codespaces gives us a URL to access the web application.
Locally, when your computer connects to a network, you get an address (an IP address, like 192.168.8.9) that other computers use to reach programs running on it. But you don’t want to be limited to only one program being able to talk to the outside world, so you can further subdivide your address by using ports, usually a four digit number that you append after a colon: 192.178.8.9:3000 is the one we usually assign to our development web server.
Close unused terminals
Ever in a situation where you have a bunch of terminals open and you’re getting confused about what’s running where? Likely you’ve been using that + button to create new terminals many times, and most of the open terminals aren’t necessary anymore.
Hover over the unused terminal and click the trash icon to close it:
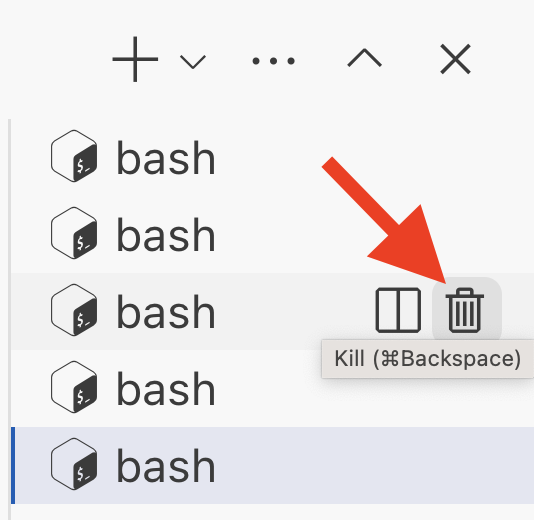
I like to keep maximum ~3 terminals open at any given time: one for entering bash prompt commands like rake grade; one for running the live app preview with a web server; and another for exploring my Ruby code or database with irb, pry, bin/console, rails console, etc.
Terminal environments
You can think of the terminal “environment” like a list of settings and configurations that change what the terminal does.
For instance, here I have three terminals open:
-
Our standard bash prompt environment for entering commands like
rake gradeorbin/server -
pryfor interacting with a database (we could also runrails consolefor that) -
irbfor typing in pure Ruby code

The irb (or pry, or rails console) command will change the bash prompt from
1
%
to (irb)
1
3.2.1 :001 >
or (console commands)
1
[1] pry(main)>
It’s important to always know which environment you are in. I cannot enter rake grade in the irb terminal, which has the > command prompt!
If I wanted to kill the irb environment and return to bash to enter rake grade or bin/server, I need to type: exit to return to my standard bash prompt:

You can also always open a new bash prompt for entering non-Ruby or database commands with the + icon. But, again, avoid opening excessive terminals.
Pagination from long commands in your database console
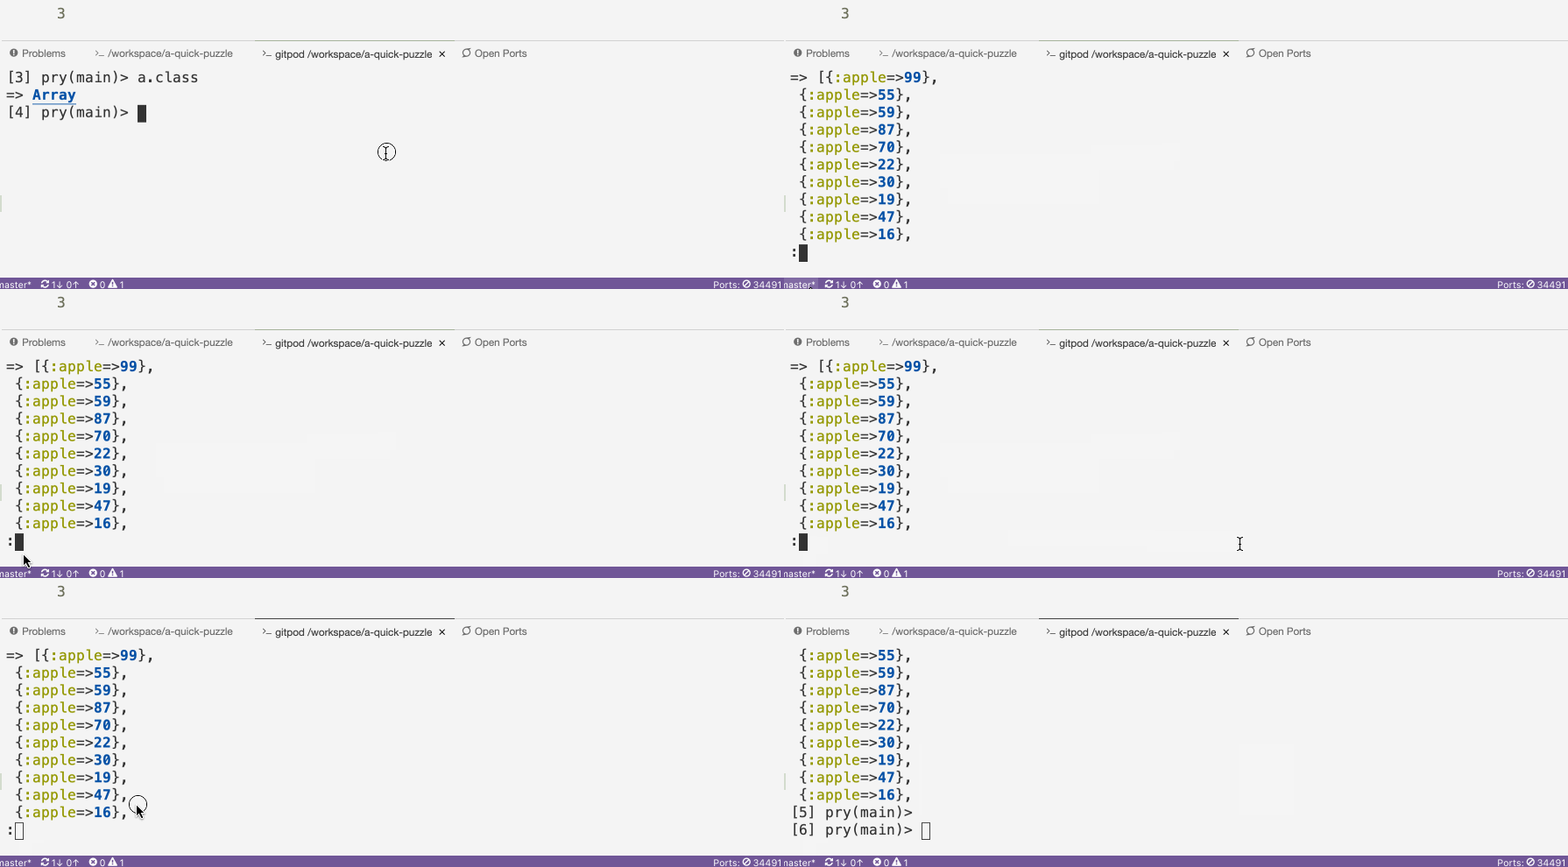
Sometimes when the output of a Ruby expression is very long, rails console is going to paginate it for you. You will have a : prompt when this is true, and you can hit return to scroll through line by line, or space to scroll through page by page.
When you reach the end of the output, you’ll see (END).
To get back to the regular prompt so that you can enter your next command, just hit q at any time.
Exit or reload after model changes
If you are in rails console and then make a change to a model (for example, you define a new method or fix a syntax error), then, annoyingly, you have to exit and then start a new rails console to pick up the new logic. The console is not live-loading with changes we make to our app. Alternatively, you can use the reload! method.
Useful keyboard shortcuts at the terminal
Tab completion
If you are running some pure Ruby .rb file, and there are multiple files with similar names or just a long name that you don’t want to type all of, start typing the name and then just press Tab on your keyboard to let the terminal complete the name. You rarely need to type full filenames out — use tab completion!
Previous commands
To re-run a previous command at the terminal, you can use the Up ↑ and Down ↓ arrow keys to look at the history of commands you’ve run in a terminal.
This is very helpful for running rake grade if you are doing it several times.
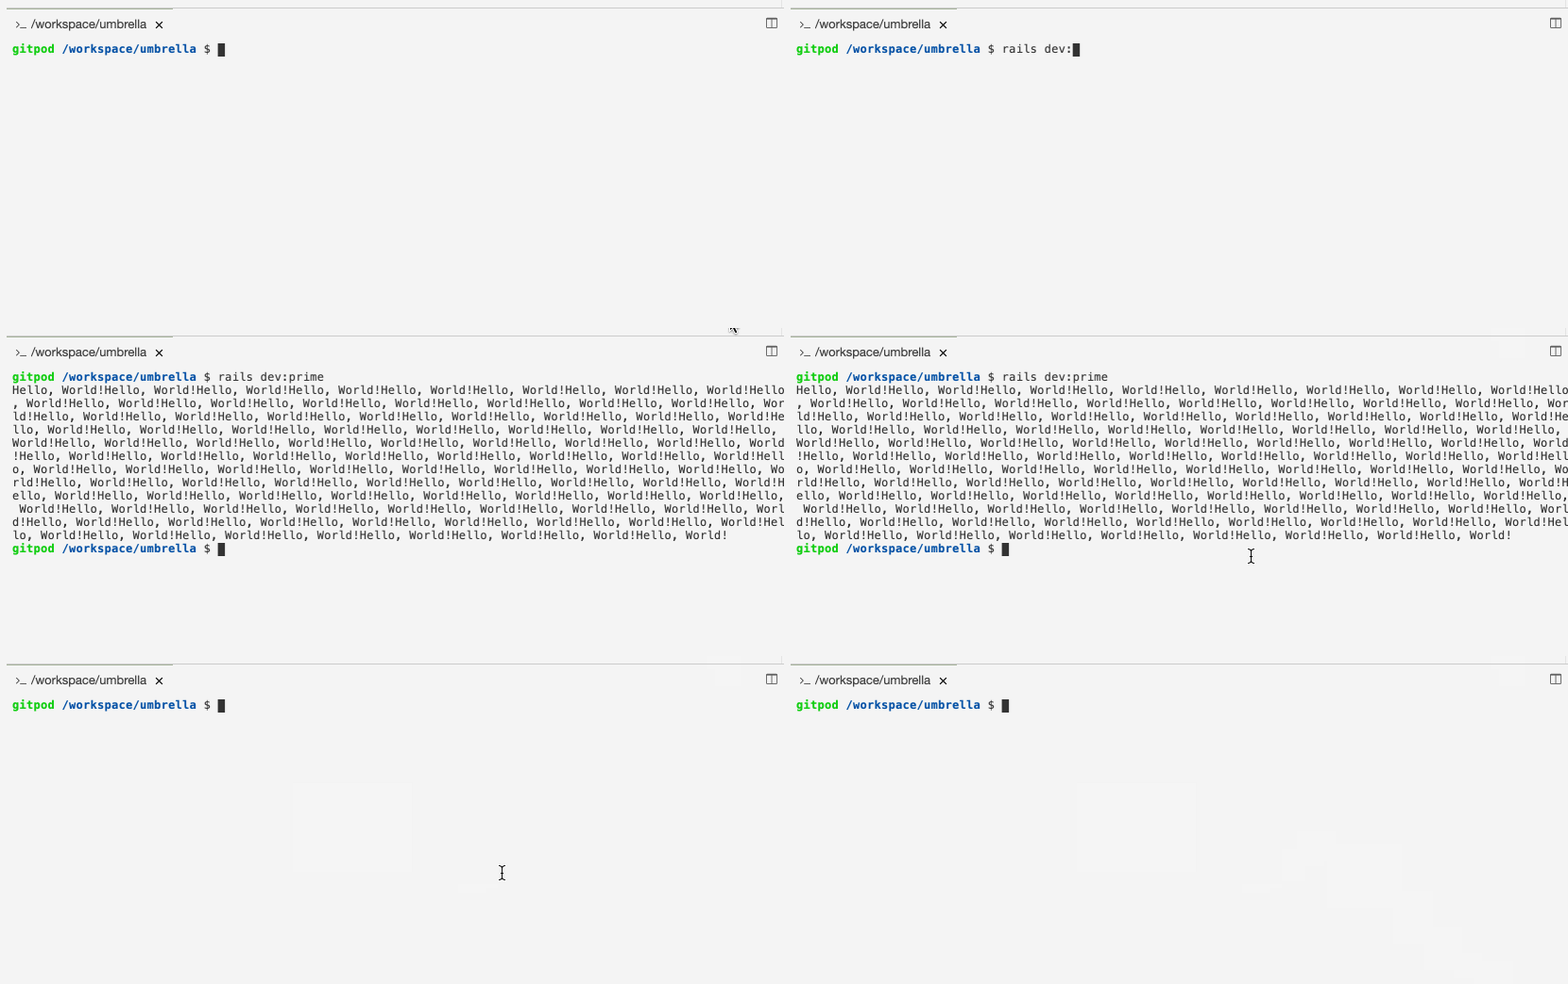
Clear Terminal
Mac OS: ⌘ + K
Windows: Ctrl + K
Interrupt command
If something goes wrong with a terminal program (i.e. you made a typo, a program gets stuck in an infinite loop, etc), you can generally interrupt it with Ctrl + C:

Q to exit
When the output of a terminal command is too tall for a terminal tab to display at once, it paginates. Press Space to step through it one page at a time, or Q to quit and get back to the terminal prompt so that you can execute your next command.
Mac OS, Windows: Q
Command Palette
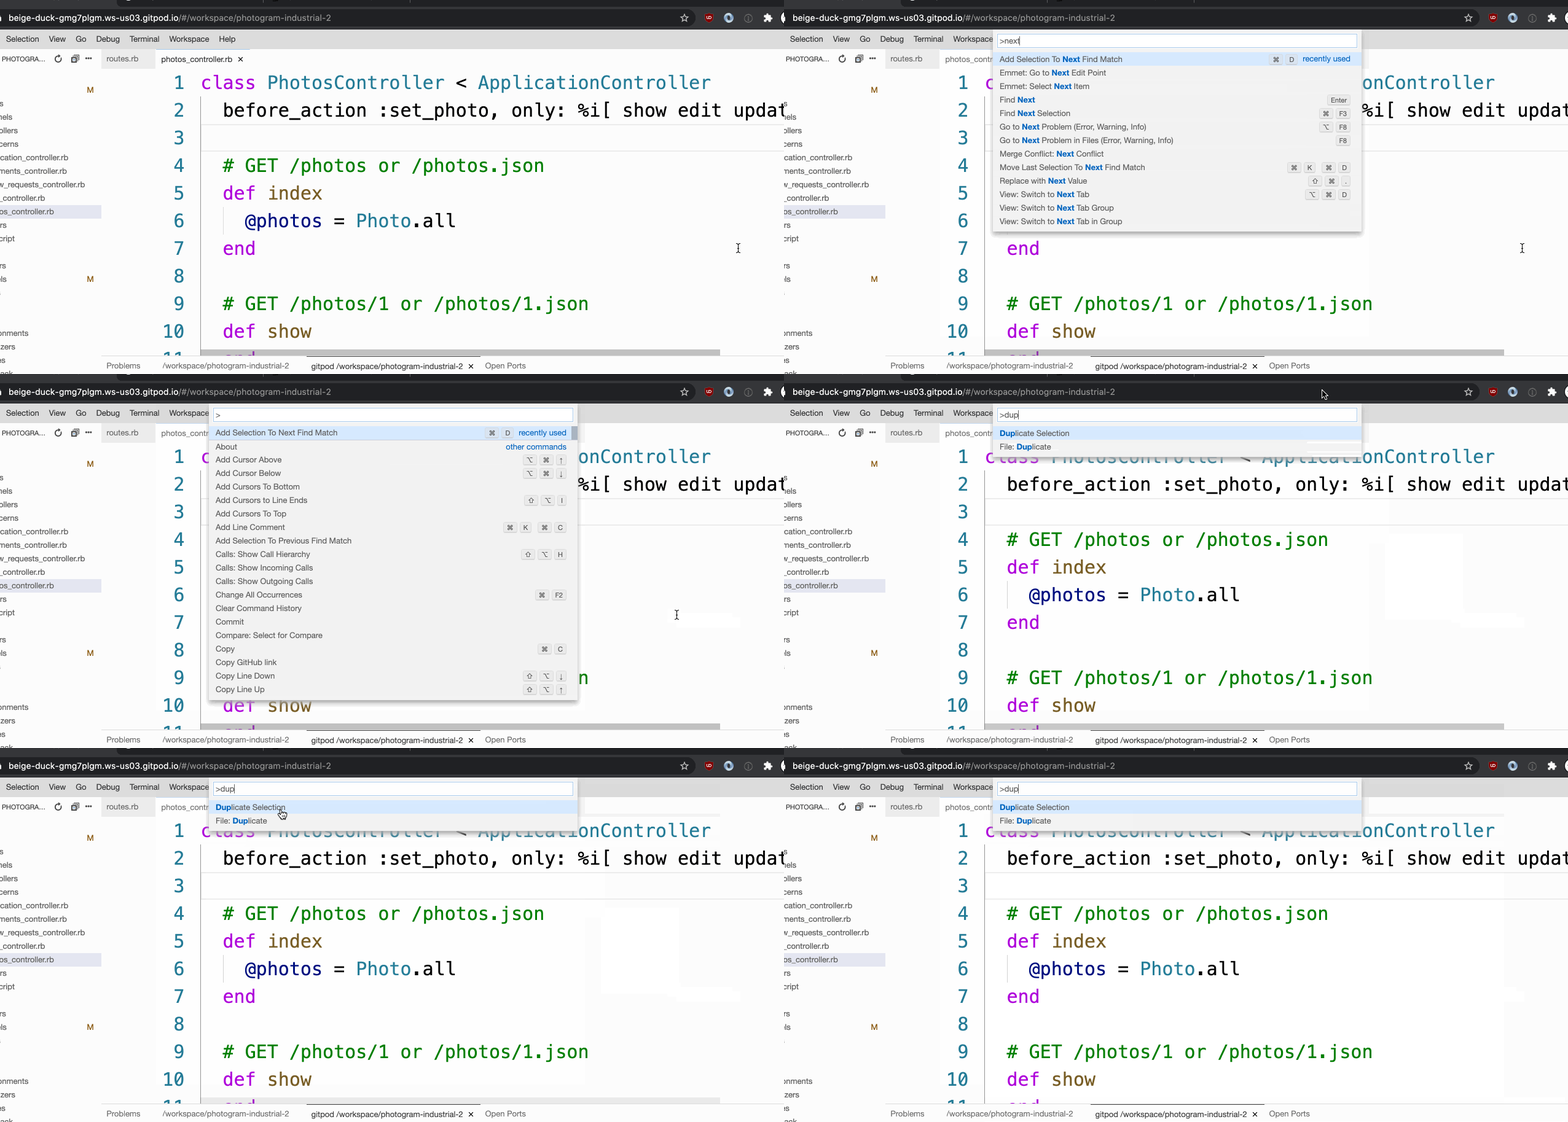
The most important thing to memorize is how to open the Command Palette, which will allow you to fuzzy search within for all other commands. If the command has a keyboard shortcut mapped to it, the shortcut will be displayed to the right. This is the best way to learn the keyboard shortcuts for the commands that you use most frequently.
Mac OS: ⌘ + Shift + P
Windows: Ctrl + Shift + P
Quick open file
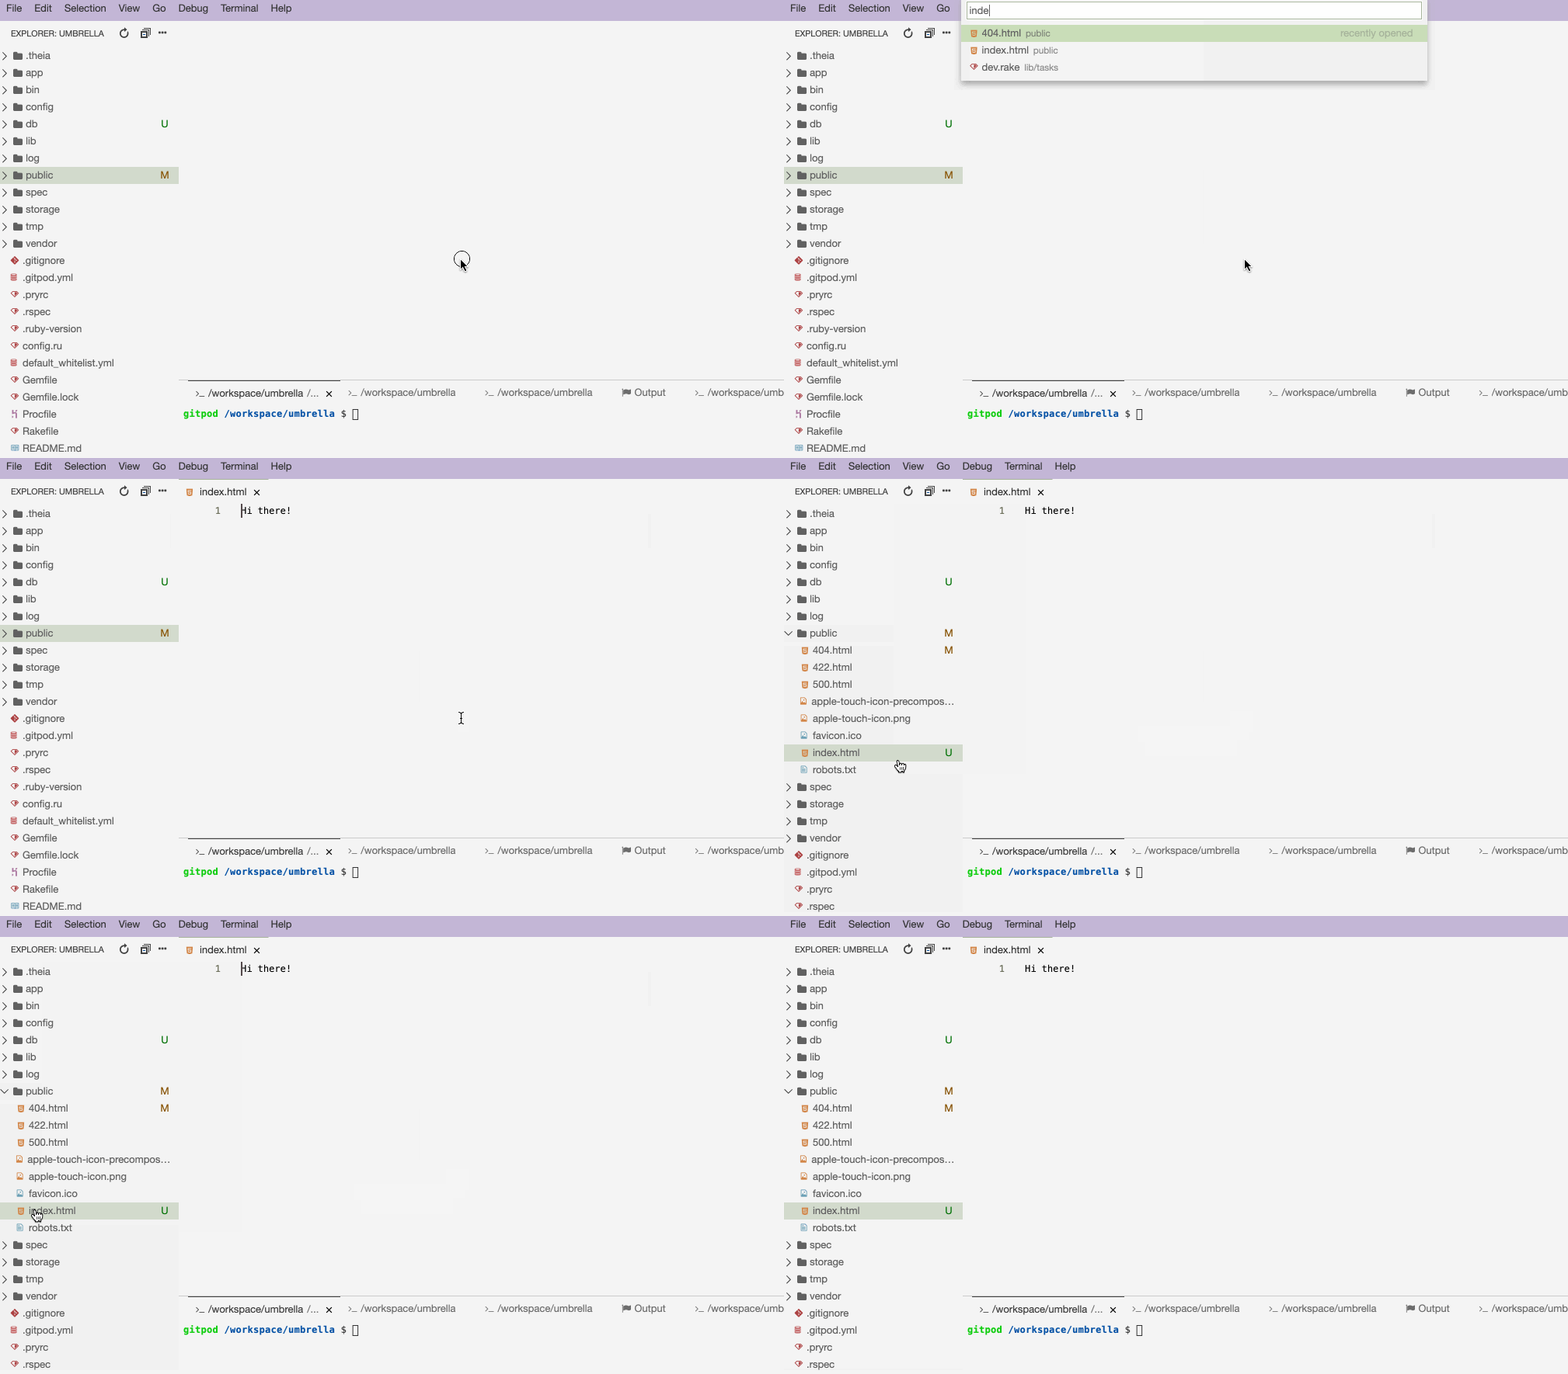
To quickly jump to a file:
Mac OS: ⌘ + P
Windows: Ctrl + P
And then fuzzily search for its name. For example, you could type “phco” to get to photos_controller.rb and the list would quickly narrow to bring that file to the top of the list.
Quiz
Before beginning the quiz, visit your codespaces dashboard at github.com/codespaces, and find a recent project you were working on. Open the codespace again with the three dot (...) menu on the right side of the codespace and select “Open in Browser”. Once the codespace boots up, use that environment to explore the keyboard shortcuts and answer the quiz questions below.
Assessment Details
Review your overall progress for this lesson
| Assessment Title | Earned Points | Current Progress | Assessment Points |
|---|---|---|---|
| VSCode Left Pane | 0.0 |
|
1 |
| Reopen Terminal Shortcut | 0.0 |
|
1 |
| Interrupt Command Shortcut | 0.0 |
|
1 |
| Terminal Prompt | 0.0 |
|
1 |
| Navigate Command History | 0.0 |
|
1 |
| Cancel Terminal Process | 0.0 |
|
1 |
| Quick Open Shortcut | 0.0 |
|
1 |
| Quick Open Feature | 0.0 |
|
1 |
| Command Palette Shortcut | 0.0 |
|
1 |
| Command Palette Fuzzy Search | 0.0 |
|
1 |
| Rails Console Command | 0.0 |
|
1 |
| Why Use the reload! Command | 0.0 |
|
1 |
| Have you tried using the shortcuts? | 0.0 |
|
1 |
| Totals | 0 | 0% | 13 |