On the forked repository page, ensure that your on the main branch, click the “Code” drop-down button, click the “Codespaces” tab, and click “Create codespace on main”:
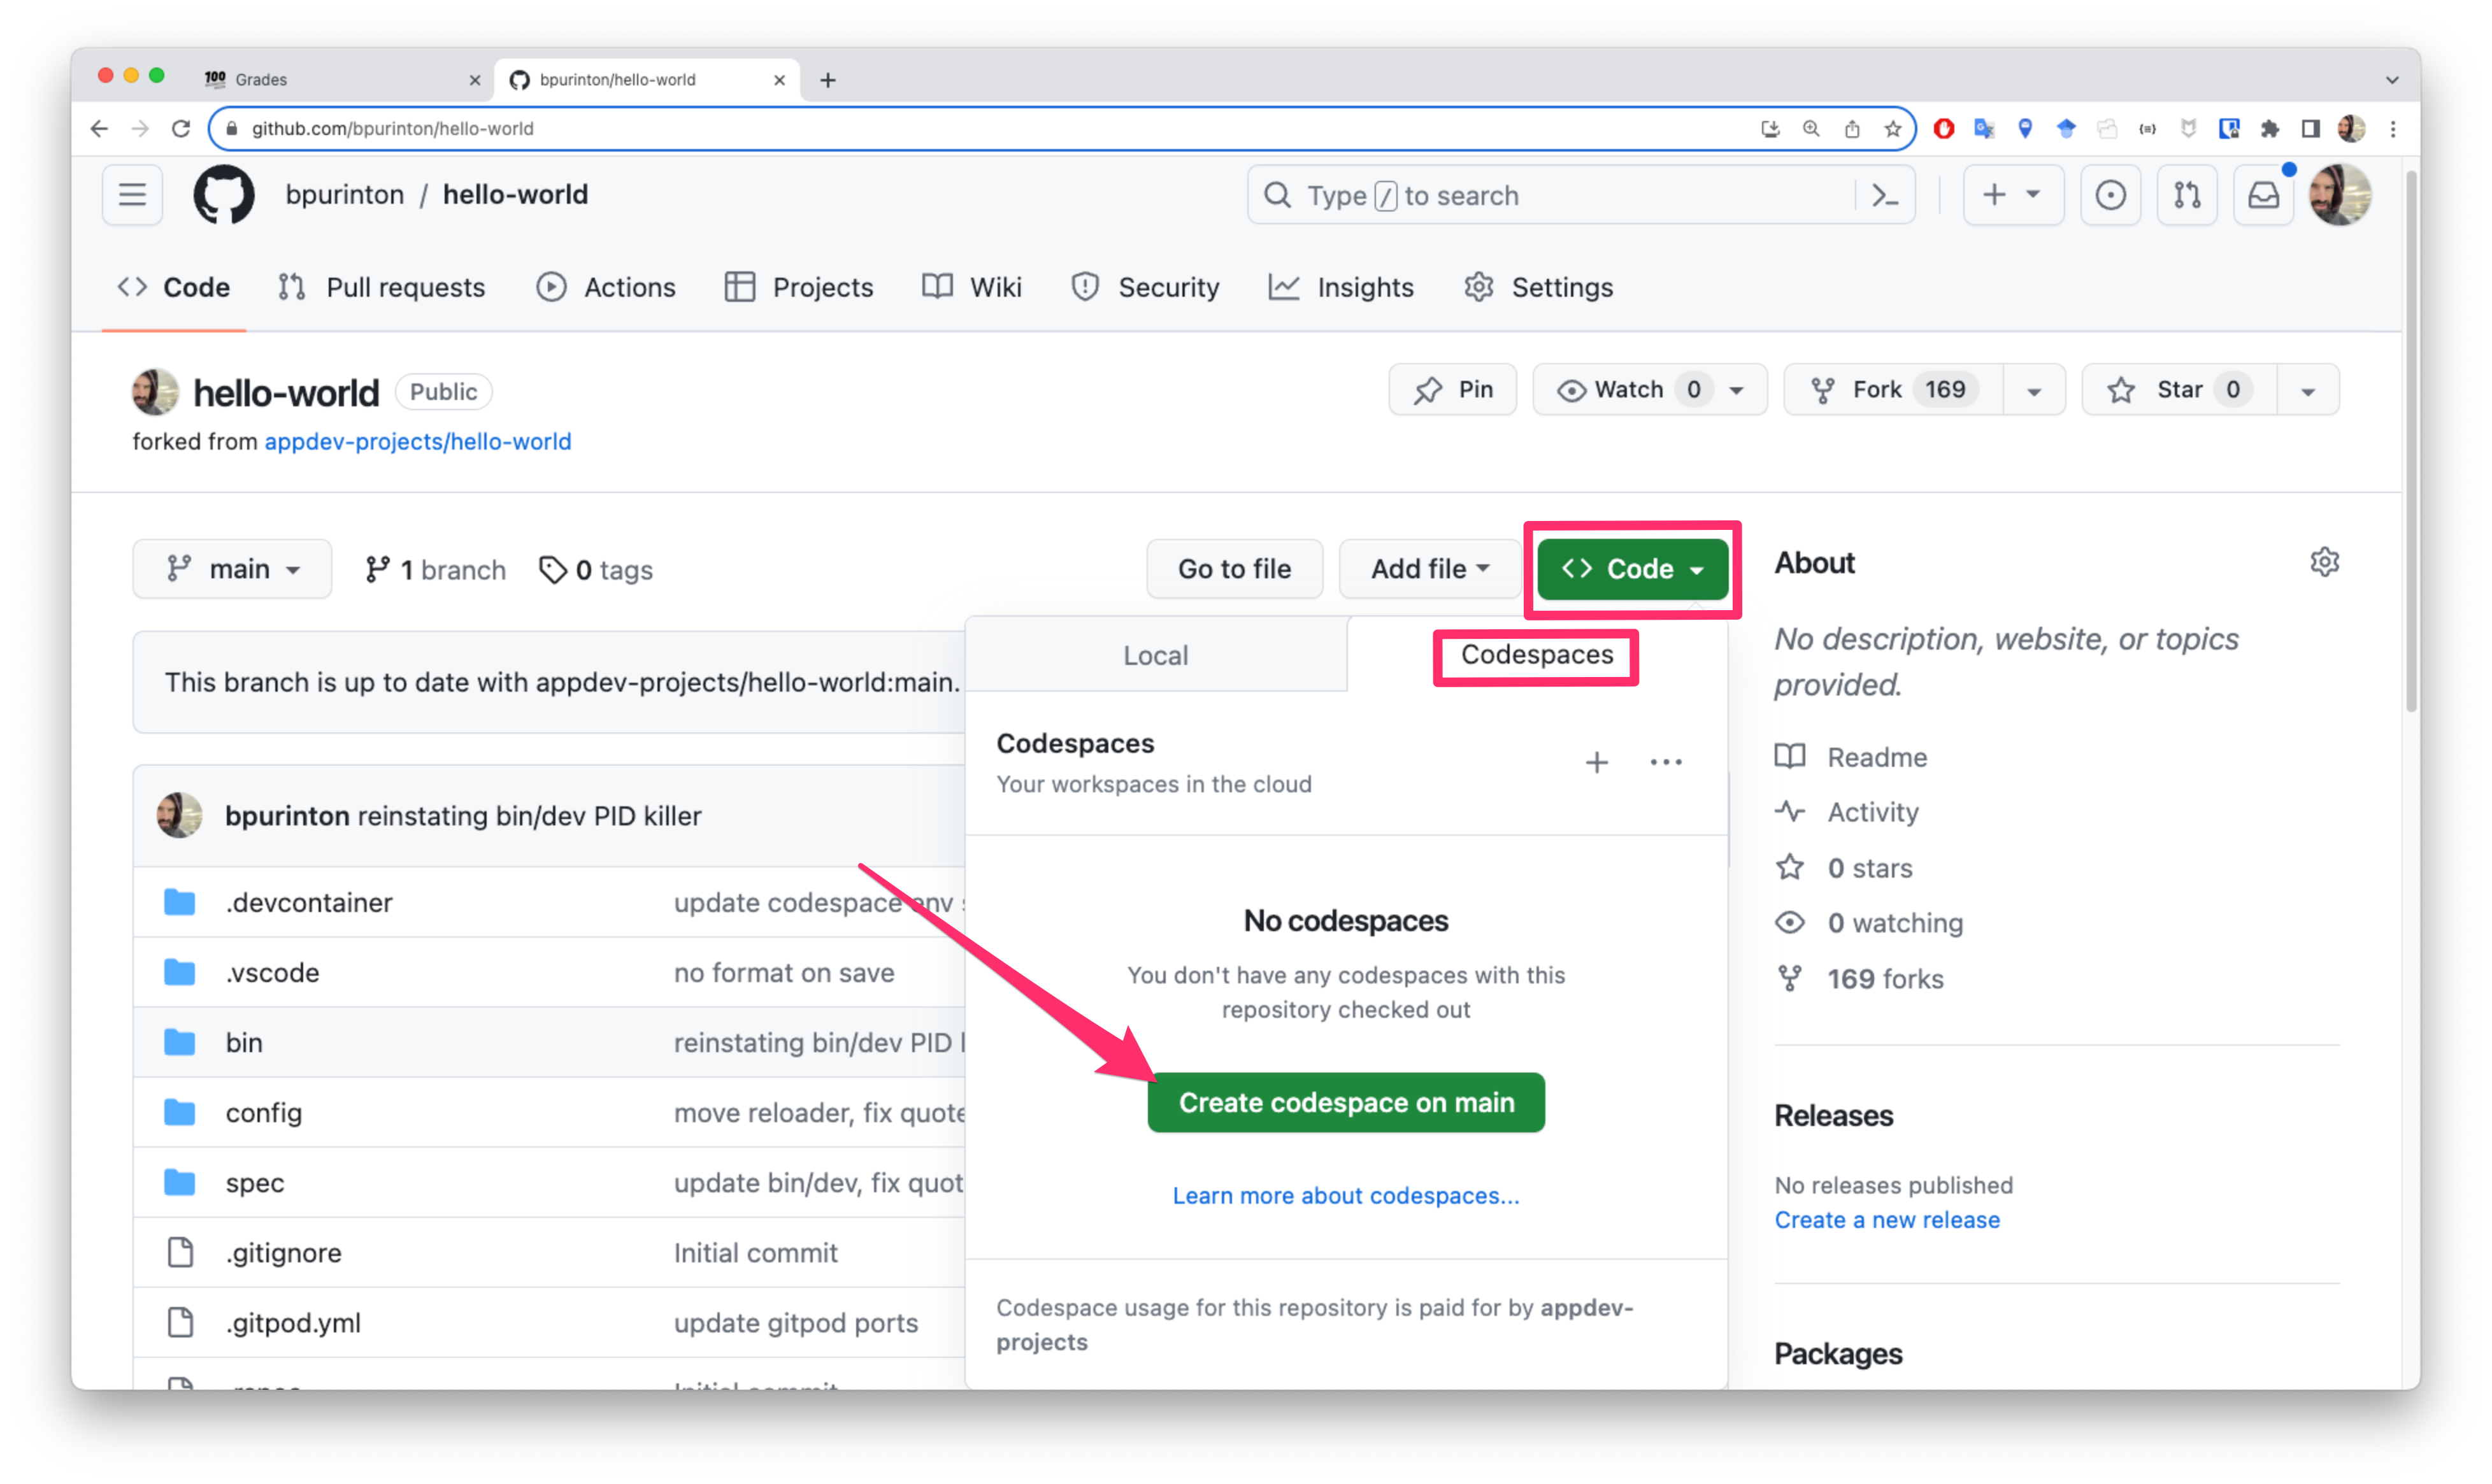
Note: Unless you specifically intend to work on another branch of the project, you should make a codespace on main. If you don’t see that option for main, use the + icon in the “Code” > “Codespaces” tab to create the codespace specifically on the main branch rather than another branch of the repository. You may need to use the drop down selection menu on the left side to switch the viewing branch to main before you click through the “Code” > “Codespaces” steps.
This will open a “Setting up your codespace page”.
Be patient. The first time you setup a codespace for a repository takes about two minutes. But subsequent loads of the codespace will be much faster.
Difference between your repository and codespace
When you open a codespace, you are renting a mini computer in a warehouse, loading your code as it currently exists in your repository into it, and interacting with the computer and code through VSCode in your browser.
If you want to save your work from that mini, ephemeral codespace computer, then you need to upload it back to your repository github.com/your-username/repo-name by making a git commit and pushing your work.
Put another way: your saved work “lives” in the GitHub repository at github.com/your-username/repo-name and the codespace is just a layer for you to edit and run your code! When you want to save your work back to your repository from the codespace, you need to make git commits and push your work.
Failing to commit and push will mean that your code is not saved on GitHub and only exists on the mini computer, which will eventually be scheduled for auto-deletion.
Until the codespace is deleted, you can visit github.com/codespaces (your dashboard), and reopen the codespace to continue working on your project.
If you have saved your work (committed and pushed) on your fork of the project repository, then, any time you wish, you can also open a fresh codespace from the repository and pickup where you left off.
Workflow for a codespaces project
The general steps for working on most projects for this course are:
-
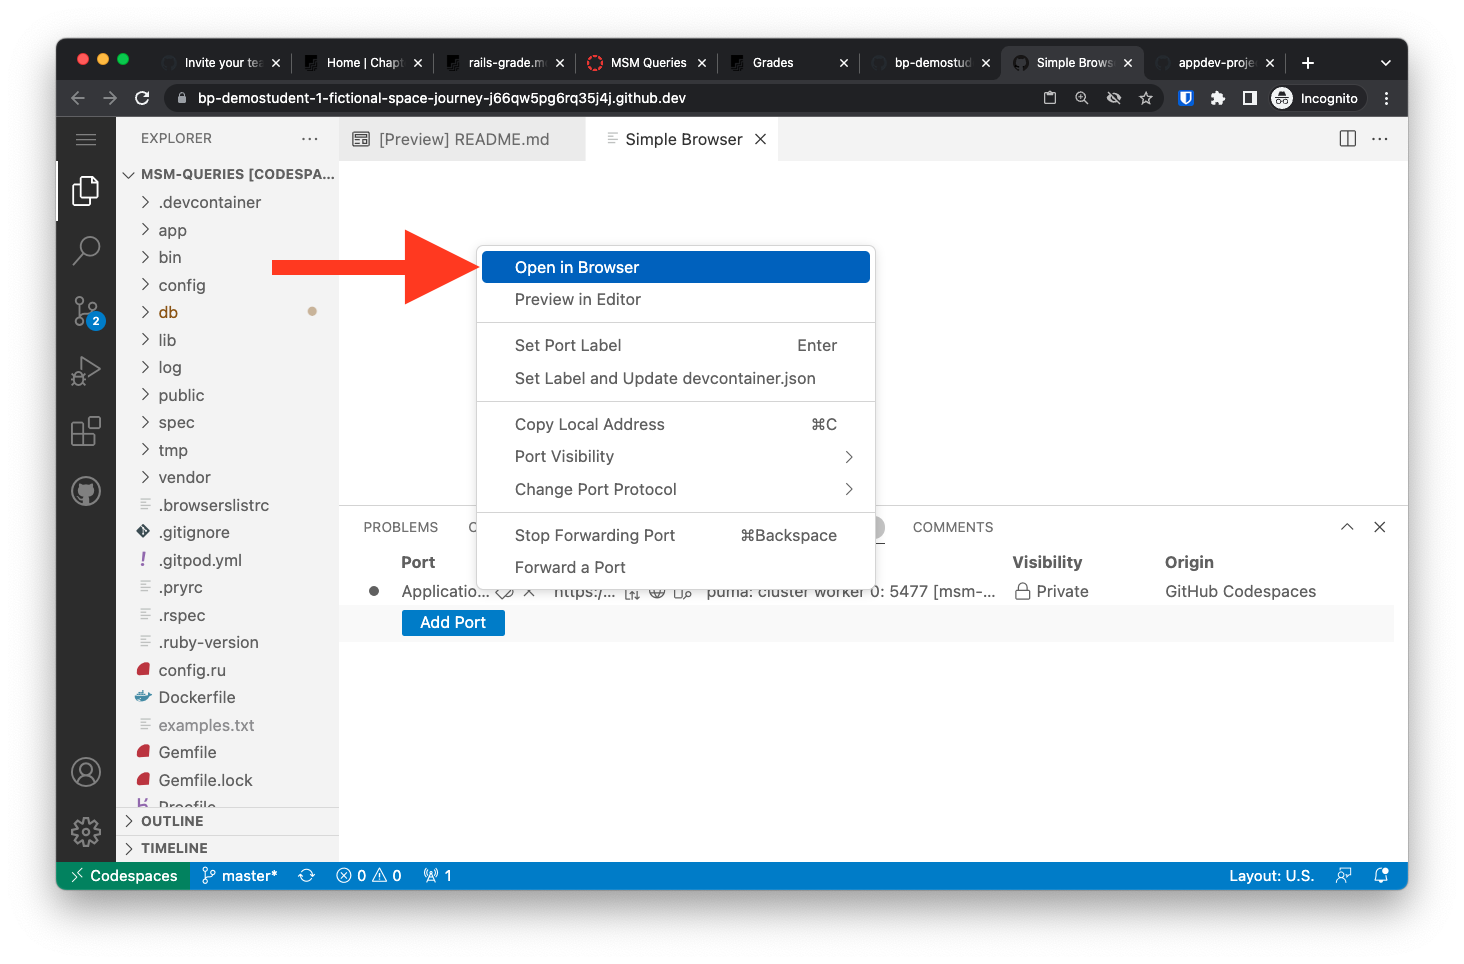
Start the web server by running
bin/serverat the bash prompt, and navigate to your live application preview from the “Ports” tab: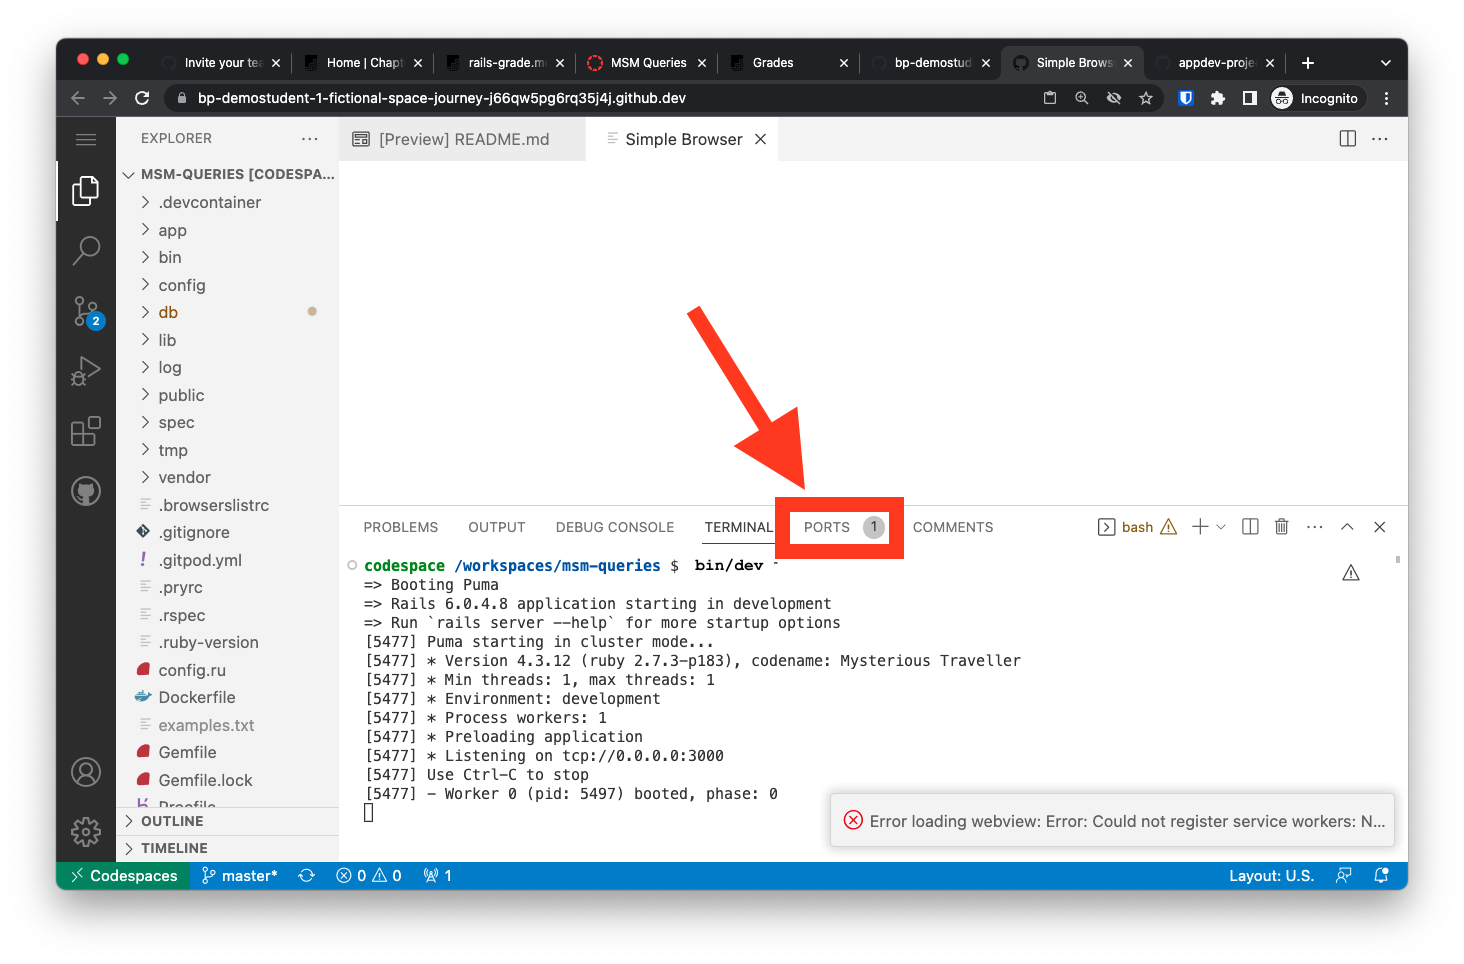
-
As you work, remember to use Git source control and Always Be Committing (ABC). Also periodically push your work to GitHub so it is saved there. See more details on our git workflow here.
-
Keep your browser tabs organized: lesson, workspace, live preview, target, and a tab for grading results.
-
Run
rake gradeas often as you like at a bash prompt to see how you are doing, but make sure you test your app manually first to make sure it matches the target’s behavior. See more details aboutrake gradein this lesson.
You will become very comfortable with these steps while working on several projects for the course, so don’t worry if you find it hard to remember now!
Syntax highlighting refresh
On occasion, you may find that your code is not highlighted correctly, and all of the code appears as plain text with no helpful colors to guide you. The missing colors are the so call “syntax highlighting” that we configured for VSCode in our codespaces. If you find that your highlighting is missing, just refresh the page. That will reload the codespace very quickly and your syntax highlighting will return:
Closing and reopening a codespace
Keep the codespace and live application browser tabs open as you work. If you close the codespace window, you can always navigate to github.com/codespaces to reopen it.
To close a codespace just navigate to github.com/codespaces, scroll down to find the codespace you want to stop, click the ... menu, and select “Stop codespace”. Reopen the codespace by clicking the ... menu again, and selecting “Open in browser”:
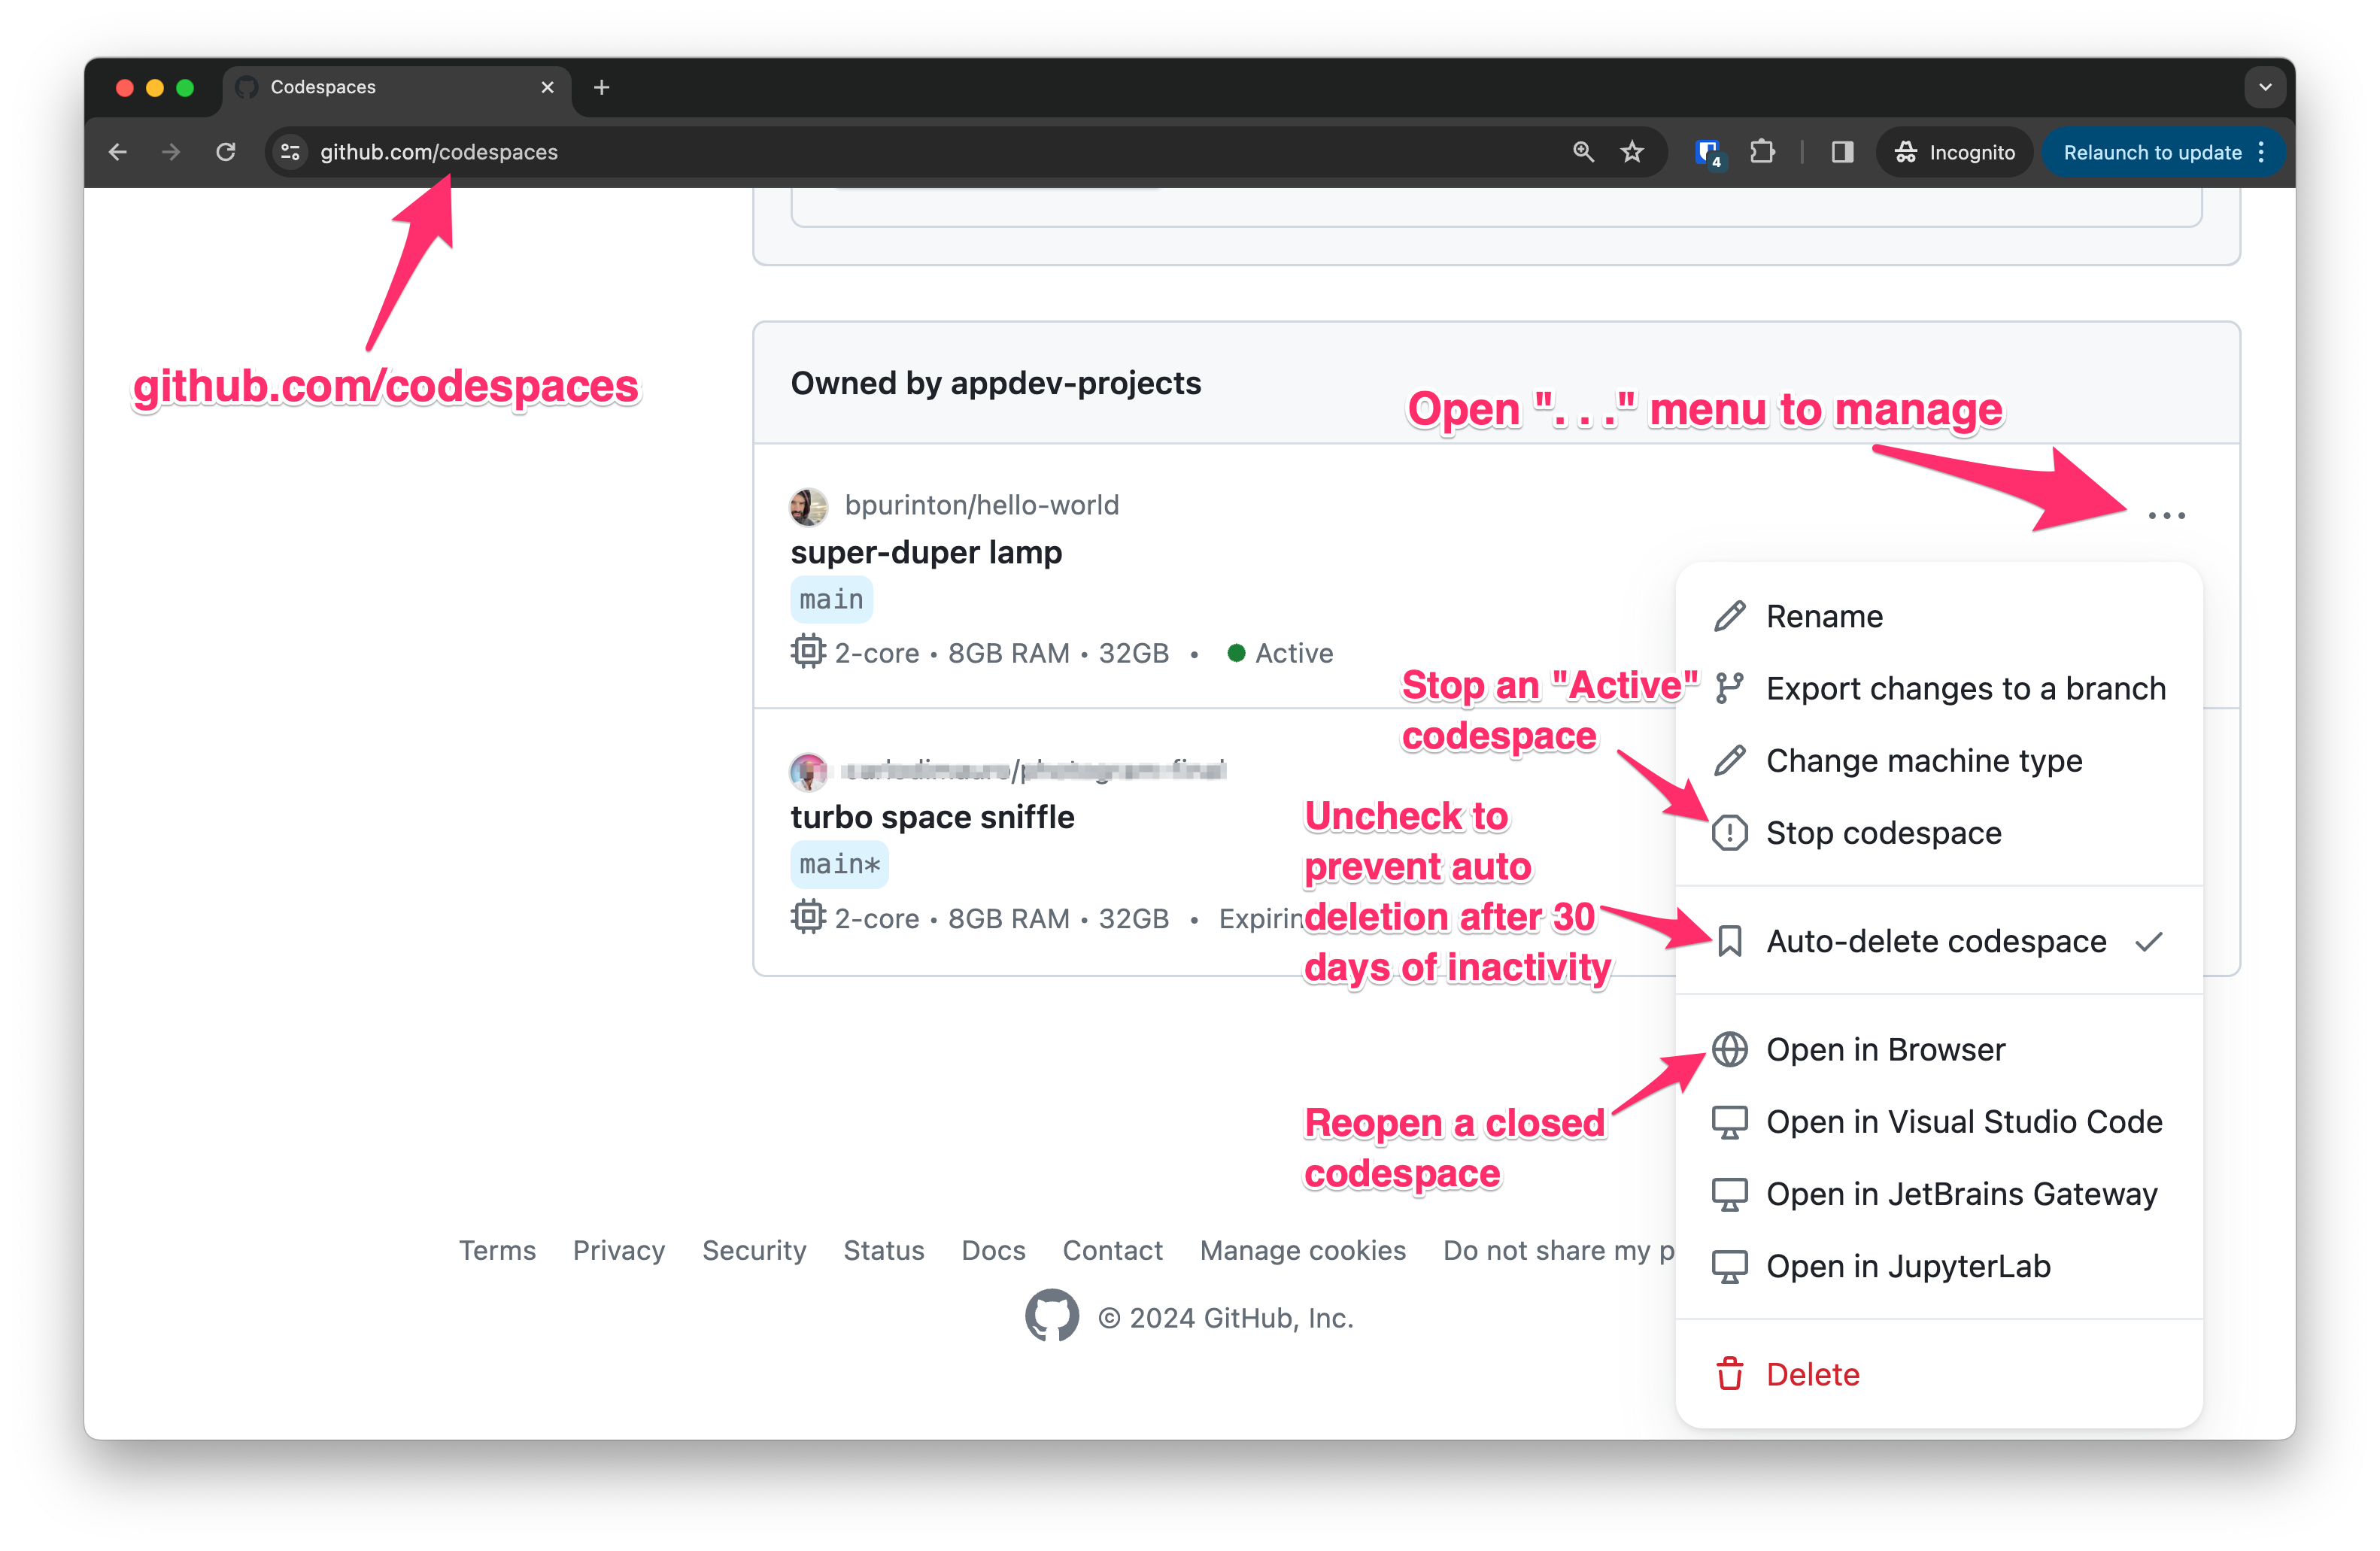
In this same management menu, you can also un-check the “Auto-delete codespace” option to prevent deletion of the codespace after 30 days of inactivity. But, as long as you are making git commits and pushing your work to save your progress, you can always spin up a new codespace directly from the GitHub repository if your current codespace gets deleted.
How to handle a potentially corrupted codespace
Sometimes, a codespace gets corrupted during startup or when left open for a long time. Since a codespace is just a mini computer that we rented from GitHub, you can just delete it and create a new one. Here are two things you can try if you think that, despite having done everything correctly in a lesson or project, you are getting unexpected errors in your codespace when you try to run your server and/or run your rake grade tests:
-
In your terminal, cancel the server that is running with
Ctrl+Cand then restart it withbin/server. Then in the Ports tab, find the active port the filled in circle icon on the left side and click to open it. -
If that doesn’t work:
-
Make a git commit and push (with the “Sync” button) your current progress to save the work on the GitHub repository. (Remember, a codespace is not the same thing as your GitHub repository; your saved work “lives” in the GitHub repository and the codespace is just a layer for you to edit and run your code!)
-
Then go to
github.com/codespaces, and find the codespace you were working in. -
Use the three dot menu on the right side of the list of codespaces to “Delete” that codespace.
-
Back on your GitHub repository at
github.com/your-github-username/project-name, open a new codespace. All of your previous work will be there, as long as you be sure to git commit and push (with the “Sync” button) before deleting the corrupted codespace.
-
Make the live app preview public
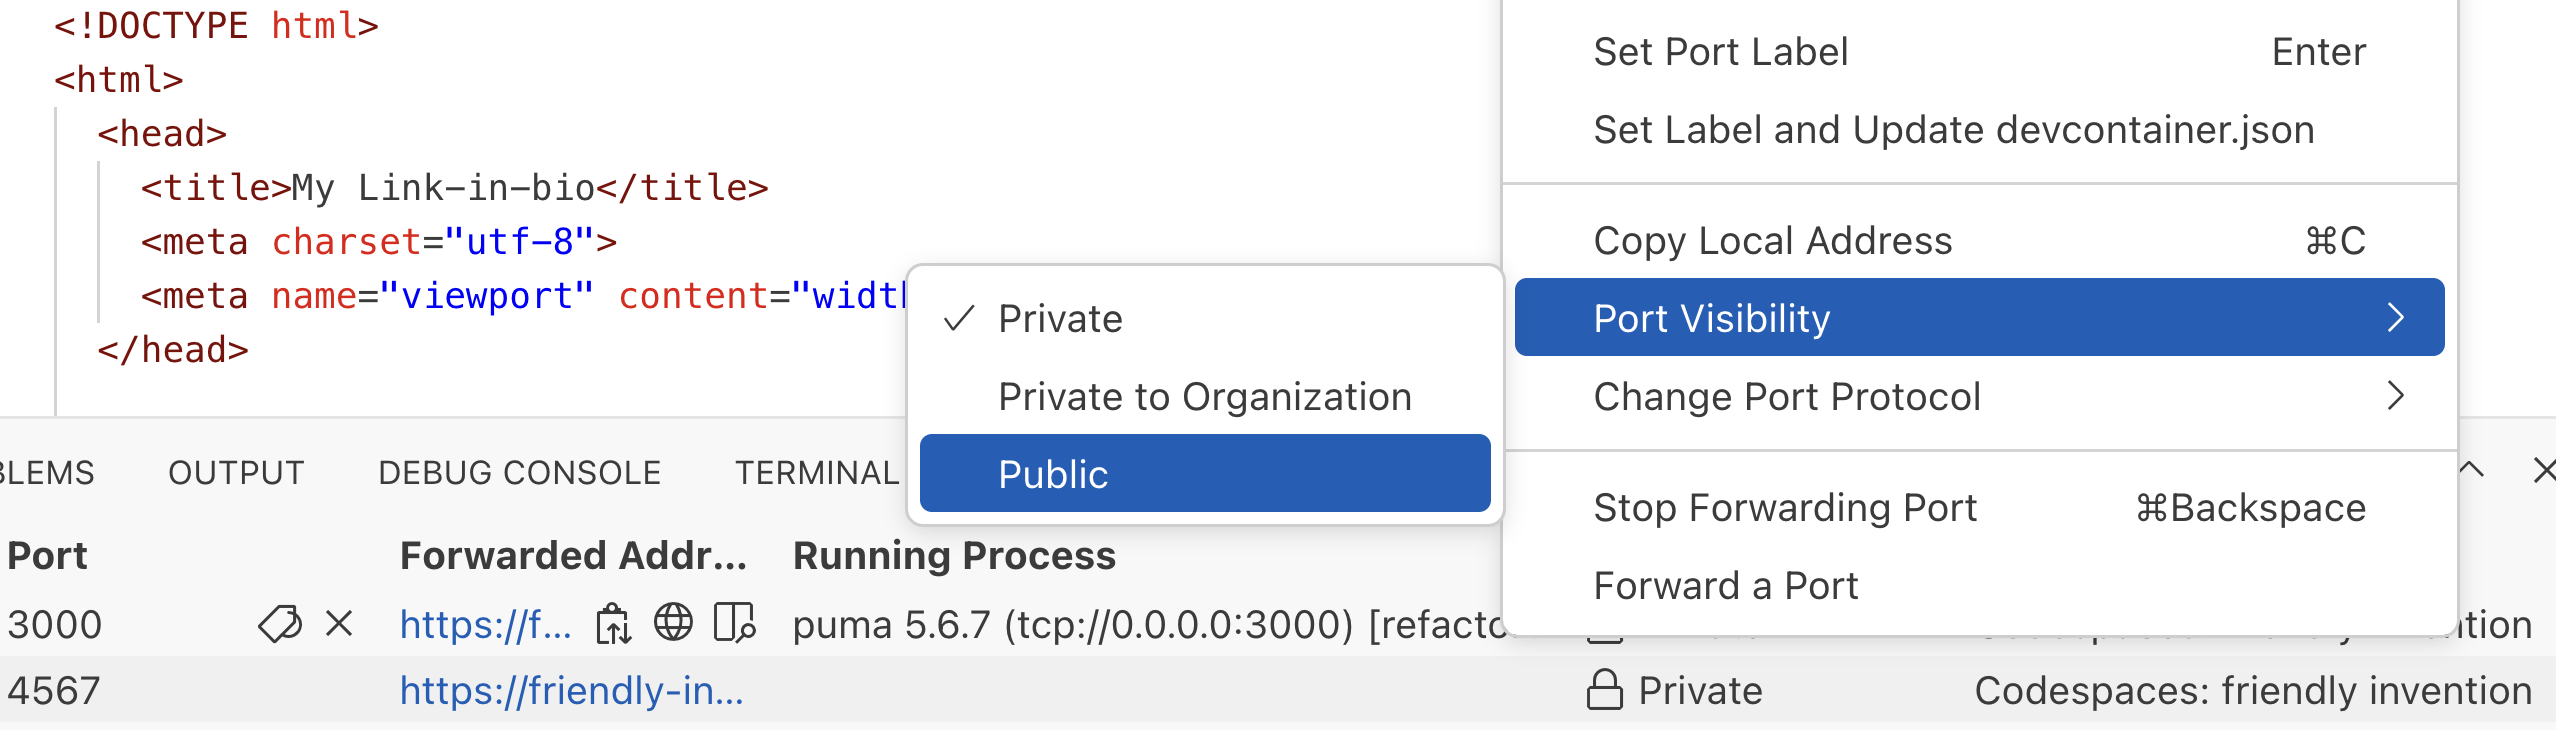
Sharing your live app preview link requires the recipient to sign in with GitHub. While developing in a codespace, you can make any port publicly available while running. In the “Ports” tab of the terminal, right-click on your live app preview port (port 3000) and select “Port Visibility” > “Public”.
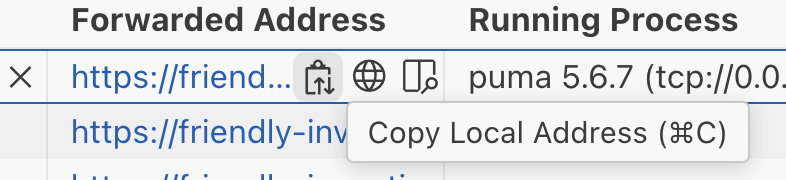
After that, use the “Copy Local Address” button to copy the live app preview address and share it, including sending it to yourself for mobile testing (a quick email to yourself with the link works well):
Increasing cores on a codespace
If you note poor performance of your codespace, you can increase the number of cores used. By default codespaces are started on a 2-core machine.
For a new codespace
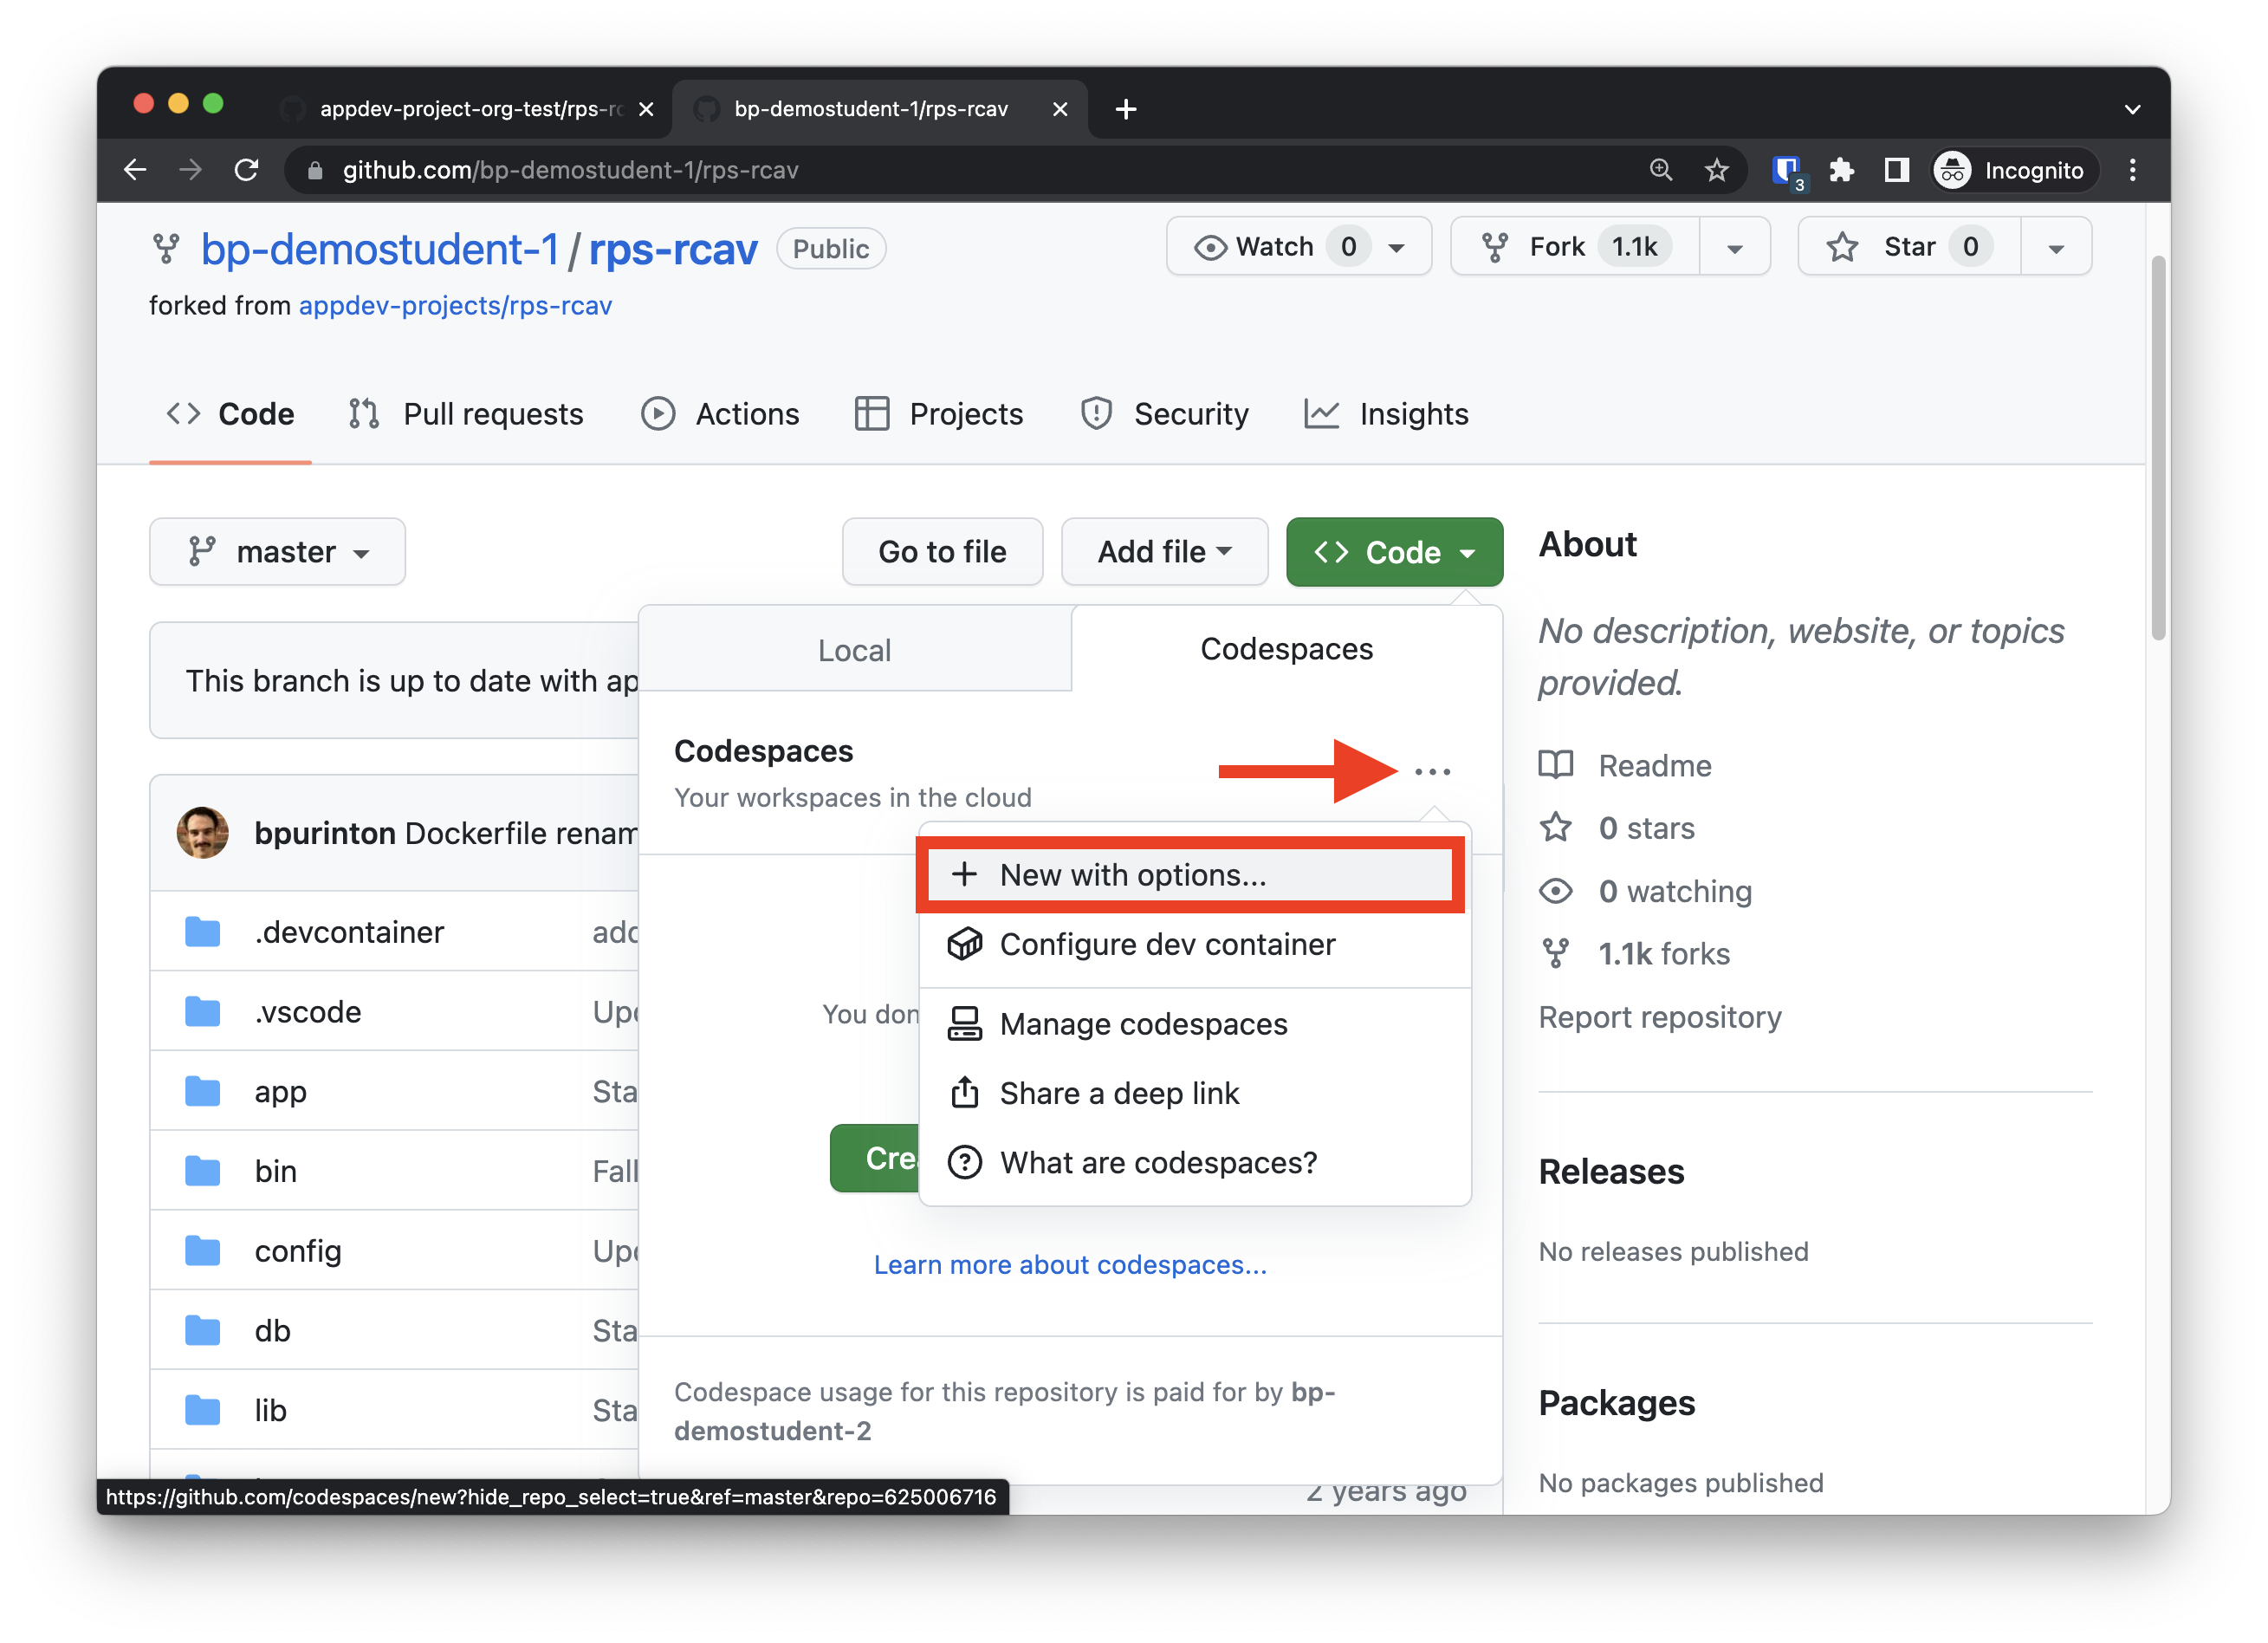
When you start a codespace for the first time, you can configure this setting by clicking on the menu icon and selecting “+ New with options”:
On the next screen, use the drop-down menu to select a 4-core machine (8- or 16-core is not necessary and we do not recommend this right now). After this is selected, click “Create codespace”:

For an existing codespace
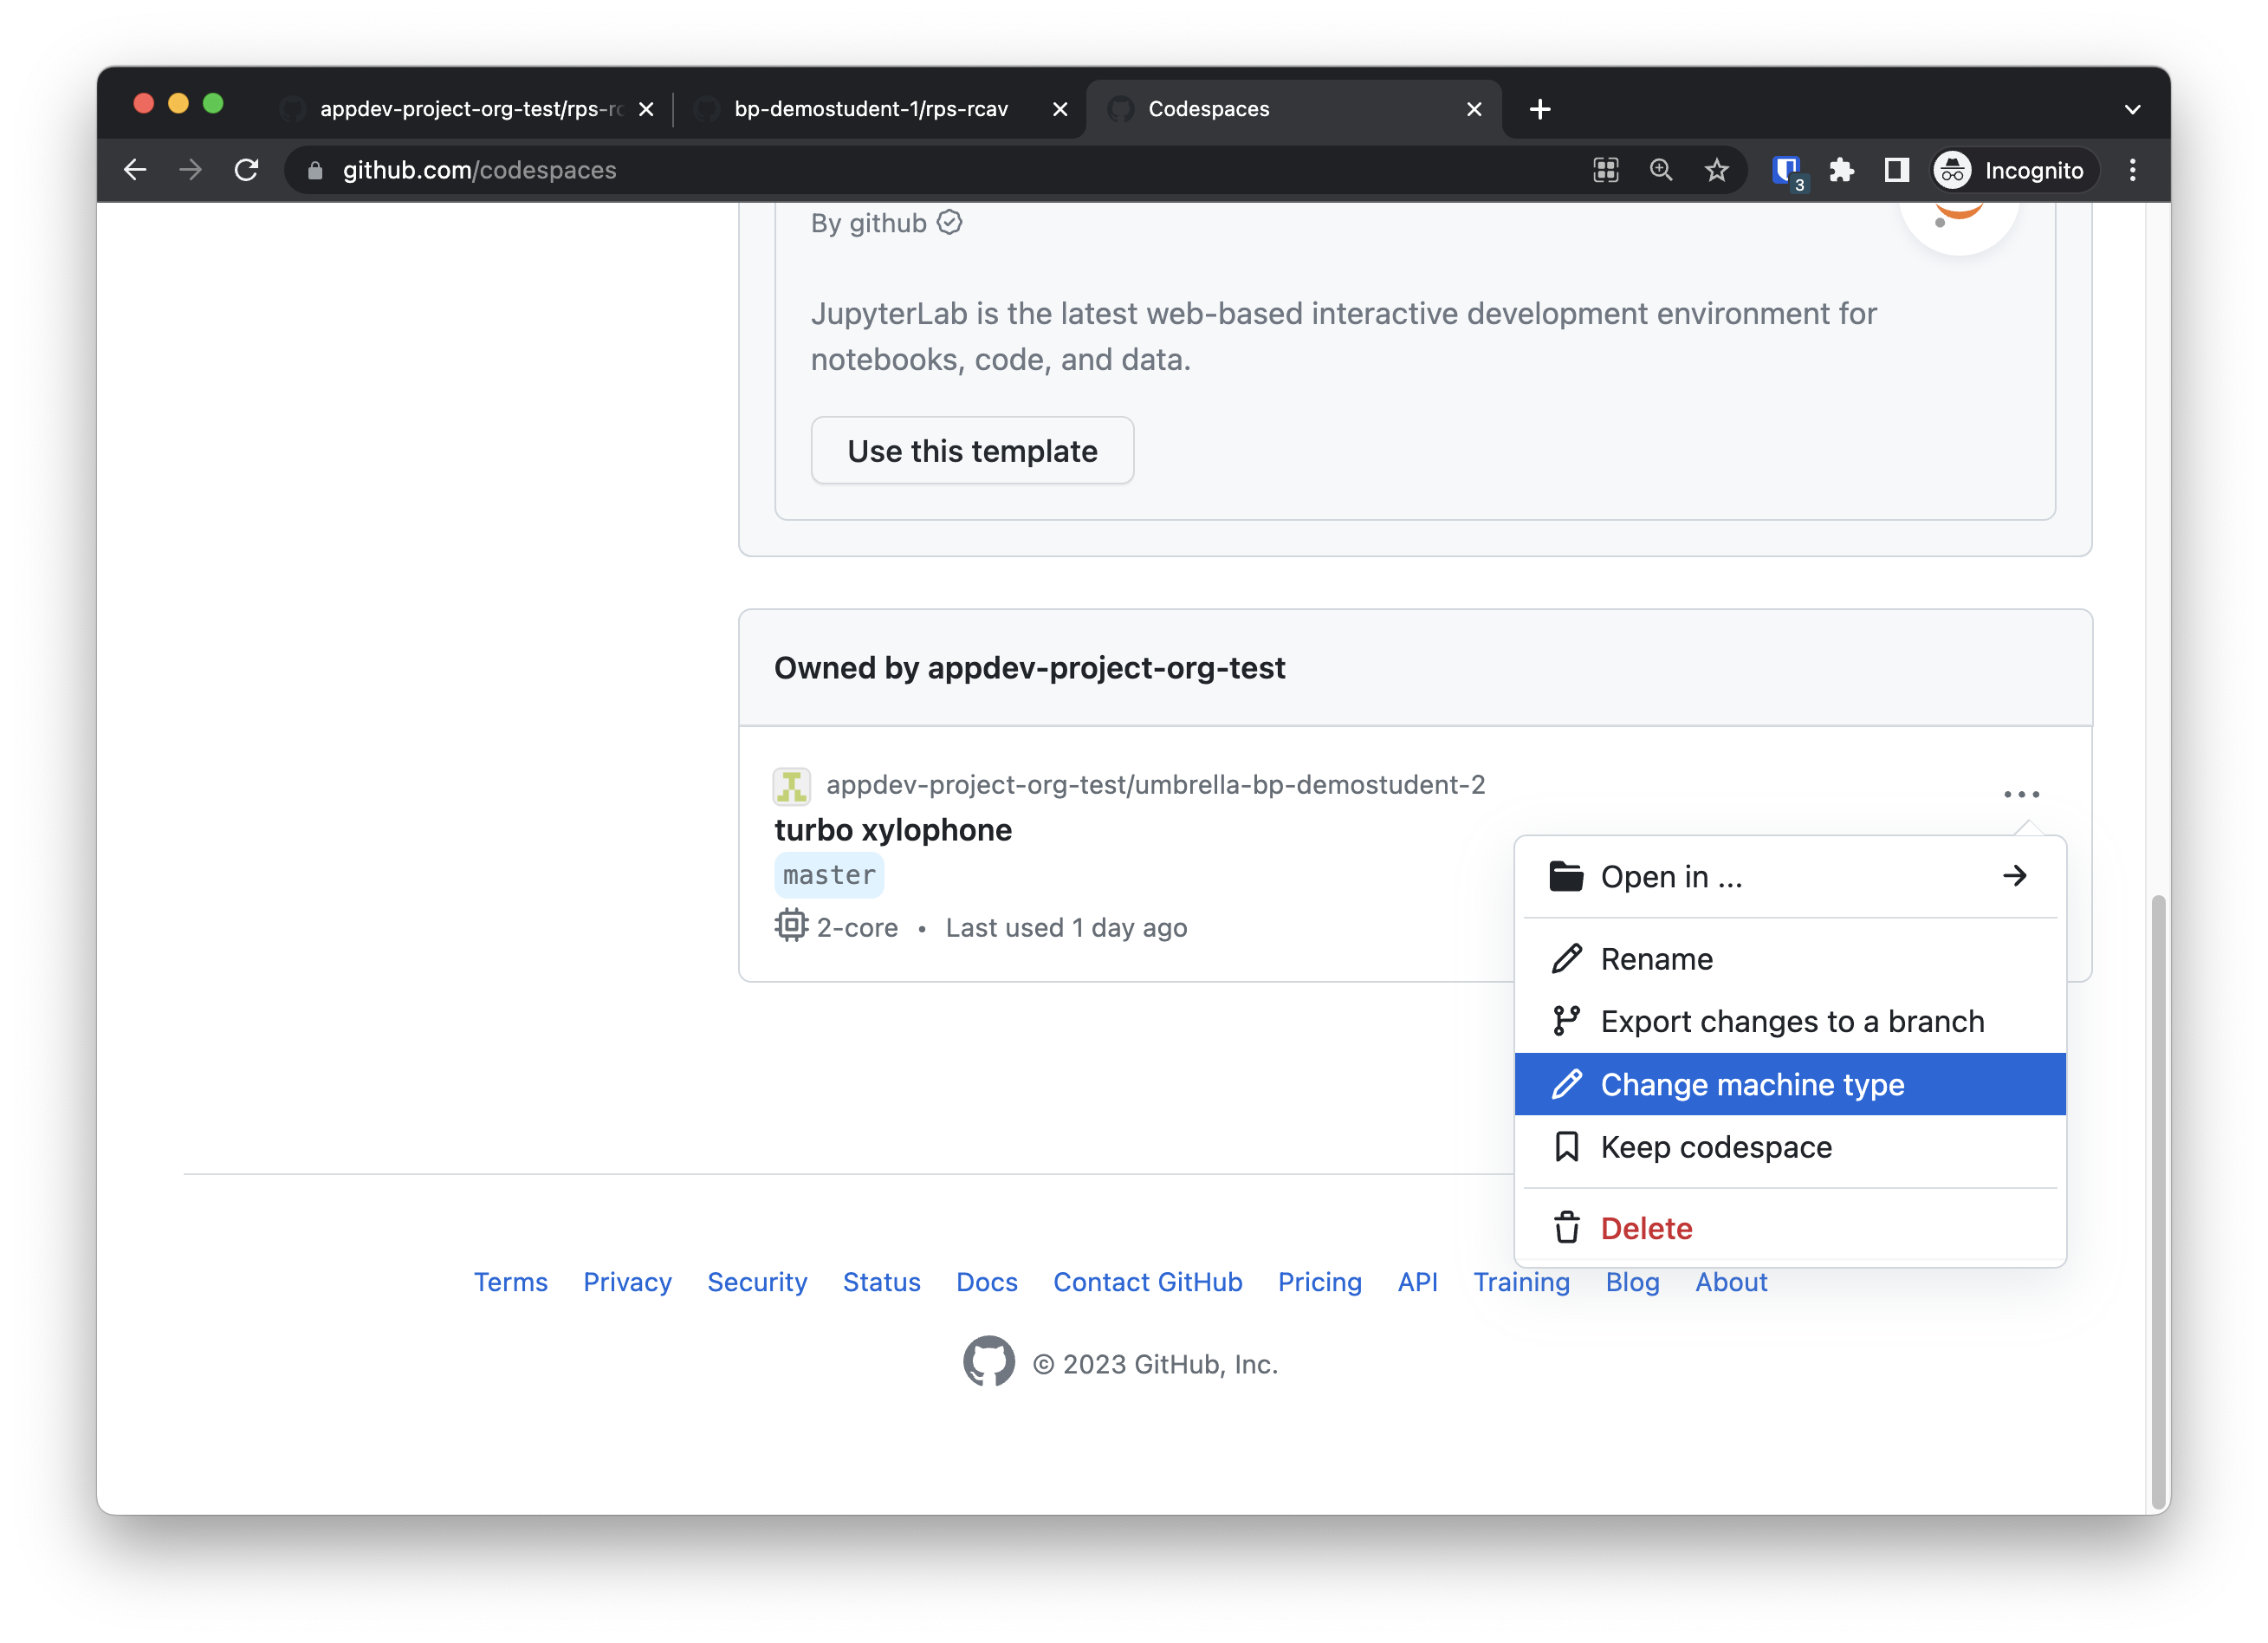
If you want to increase the cores on an existing codespace, navigate to github.com/codespaces, scroll down to find the codespace you want to increase the cores on, and select “Change machine type” from the drop-down menu:
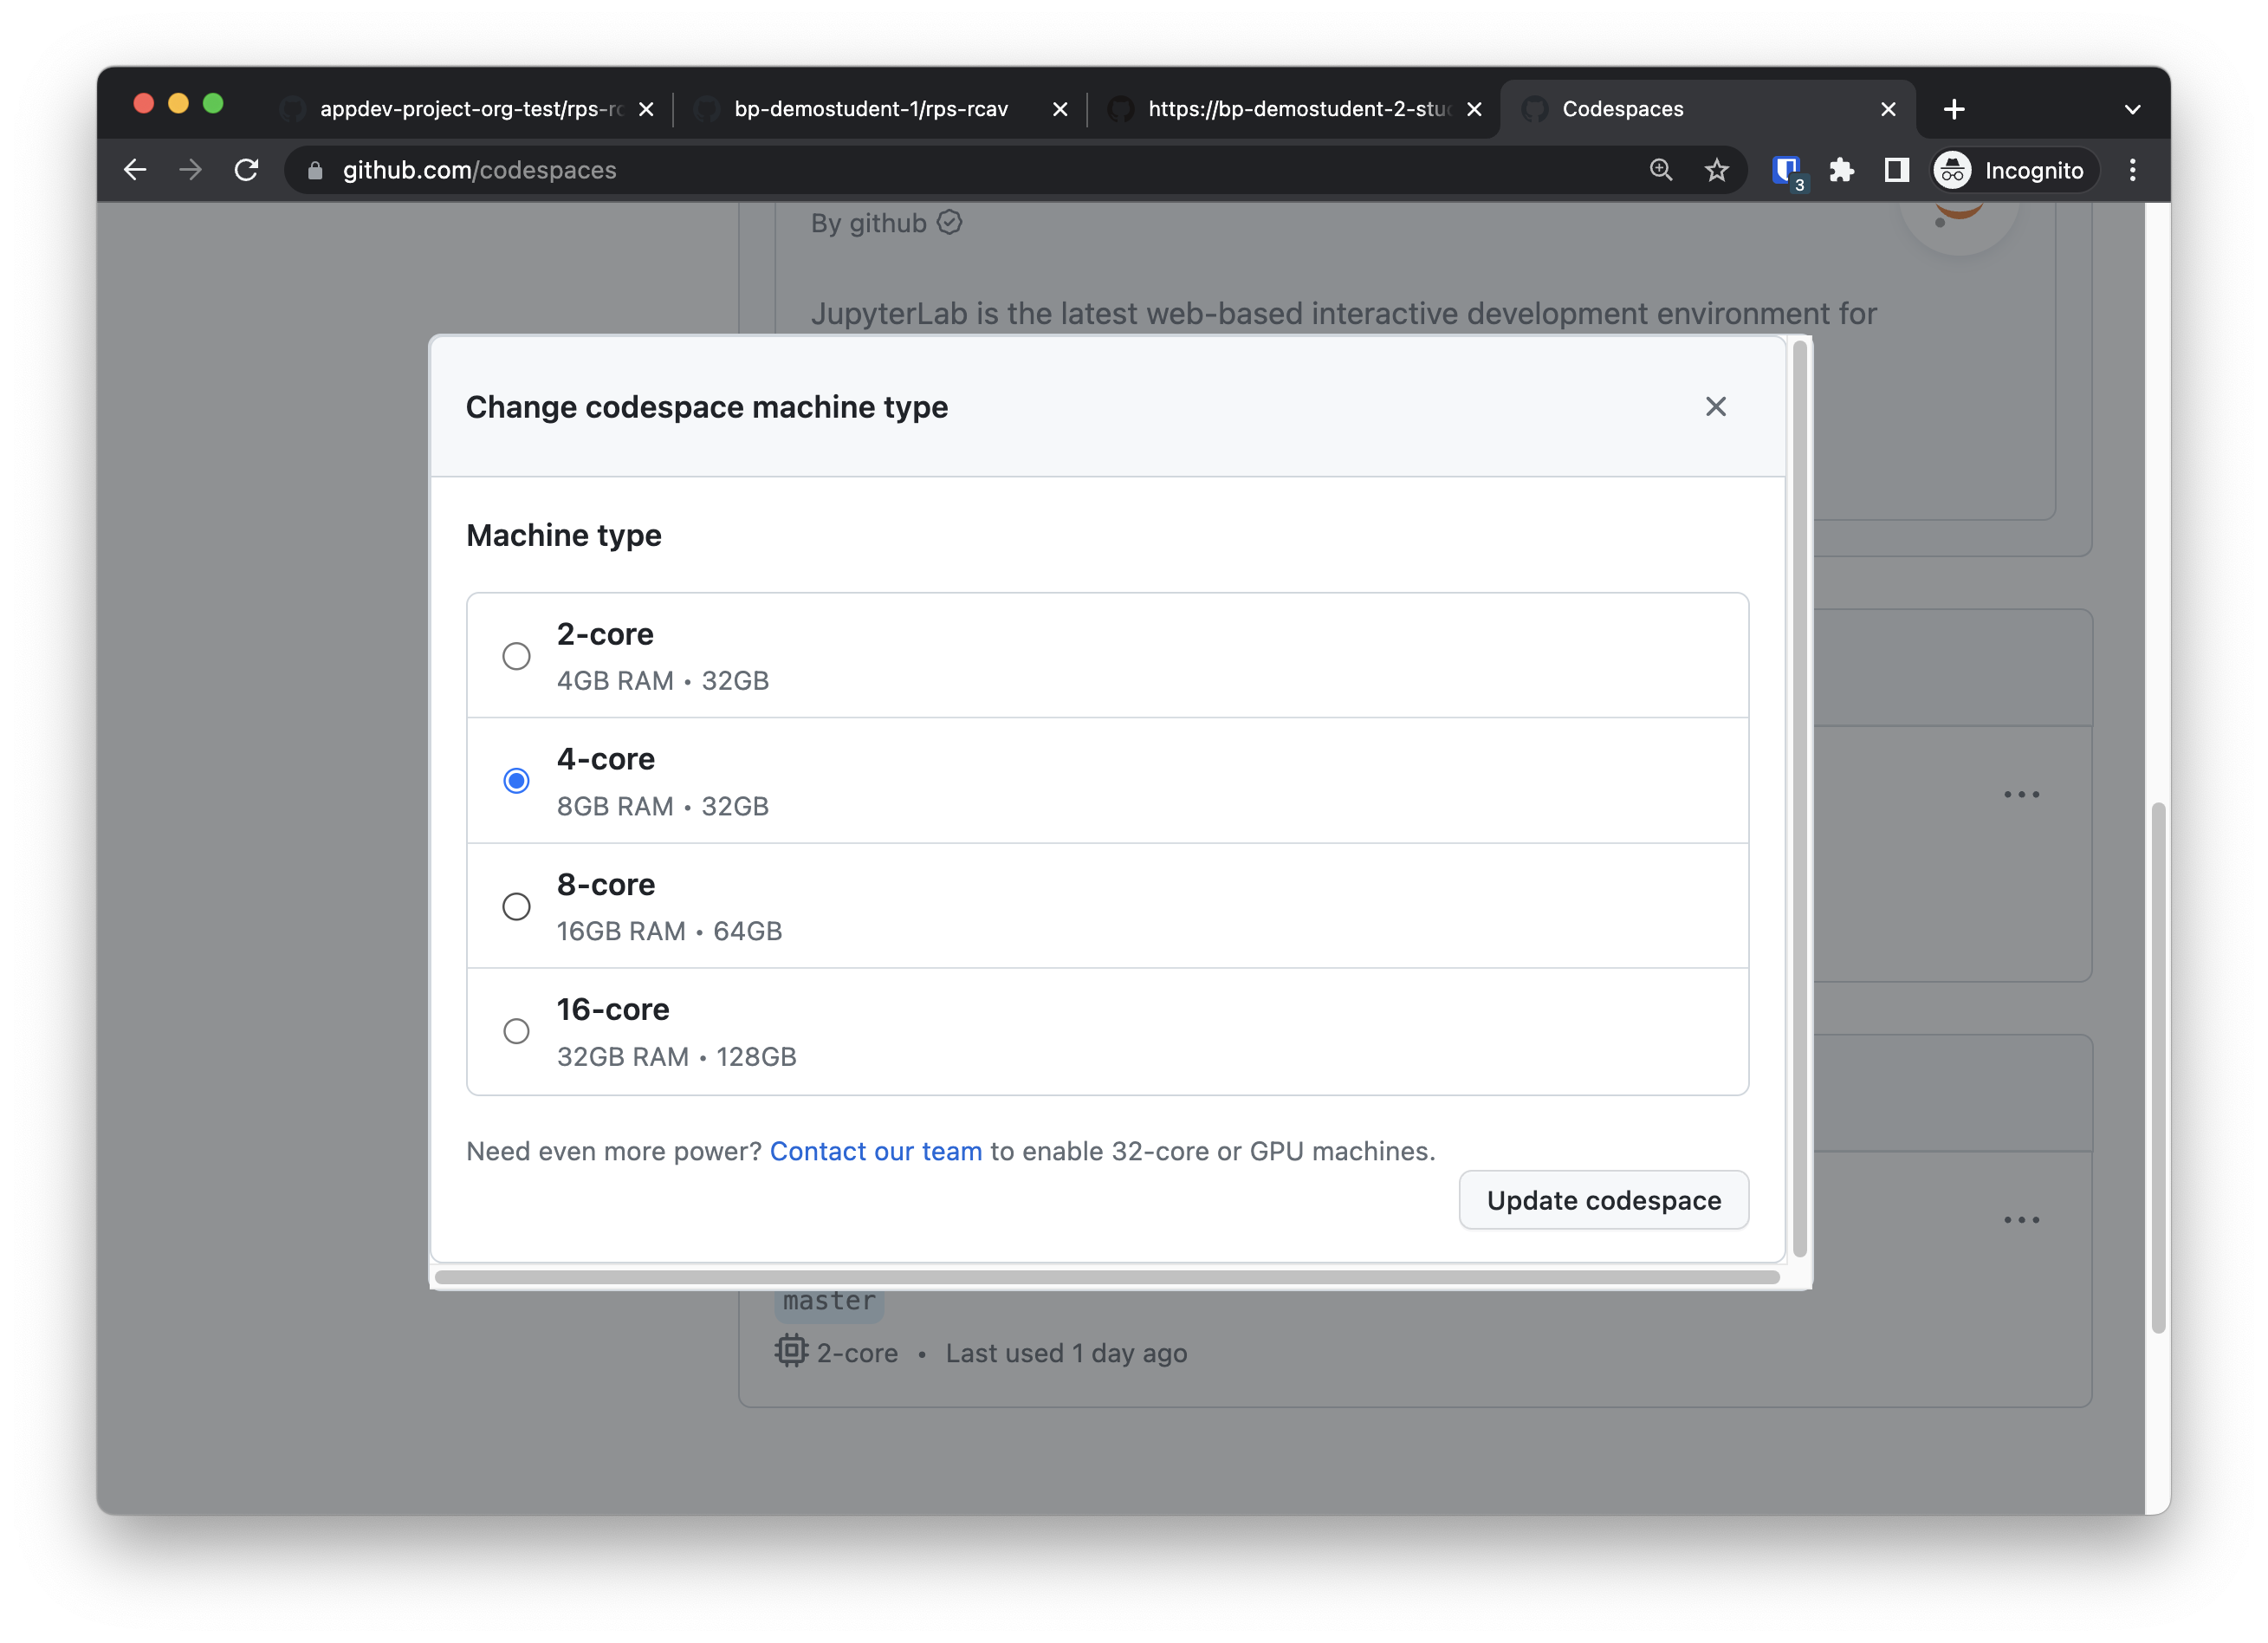
On the next screen, select 4-core and then “Update codespace”:
Sharing a codespace snapshot
With codespaces, we don’t have the ability to share direct workspace snapshots for instructor feedback and debugging. Instead, we can do so with git commits!
Simply follow the instructions in this lesson to make a new commit with your broken code. For the commit message, use Broken code snapshot X with X replaced by the number of times you are asking for help on a project (e.g., Broken code snapshot 1, Broken code snapshot 2, etc.). Be sure to also push the commit to publish it on GitHub with the “Sync” button.
Now you can just send the instructor the URL of your GitHub repository (i.e. your fork of the project at github.com/your-username/project-name) along with the commit message, and we can browse your code at that point in time and try to provide helpful suggestions.
You can even continue working on your code independently and making additional commits while you wait for the instructor feedback. You won’t be overwriting your code from the Broken code snapshot X commit that your shared.
Assessment Details
Review your overall progress for this lesson
| Assessment Title | Earned Points | Current Progress | Assessment Points |
|---|---|---|---|
| Totals | 0 | 0% | 0 |