Databases on the free plan on Render are deleted after 30 days. Also, free plans are only eligible to have one database. If you don’t want to upgrade to a paid plan, you can migrate your database to a different provider. This guide will show you the steps!
How does Render connect your database and web service
When you created your web service and database on Render, you should have seen two new services in your Render dashboard:

The web service is your Rails app, and the PostgreSQL database is the database you created.
If you click on the database to visit its dashboard page, you’ll see a “Connect” drop down menu in the top right, which lists the “Internal Database URL”:
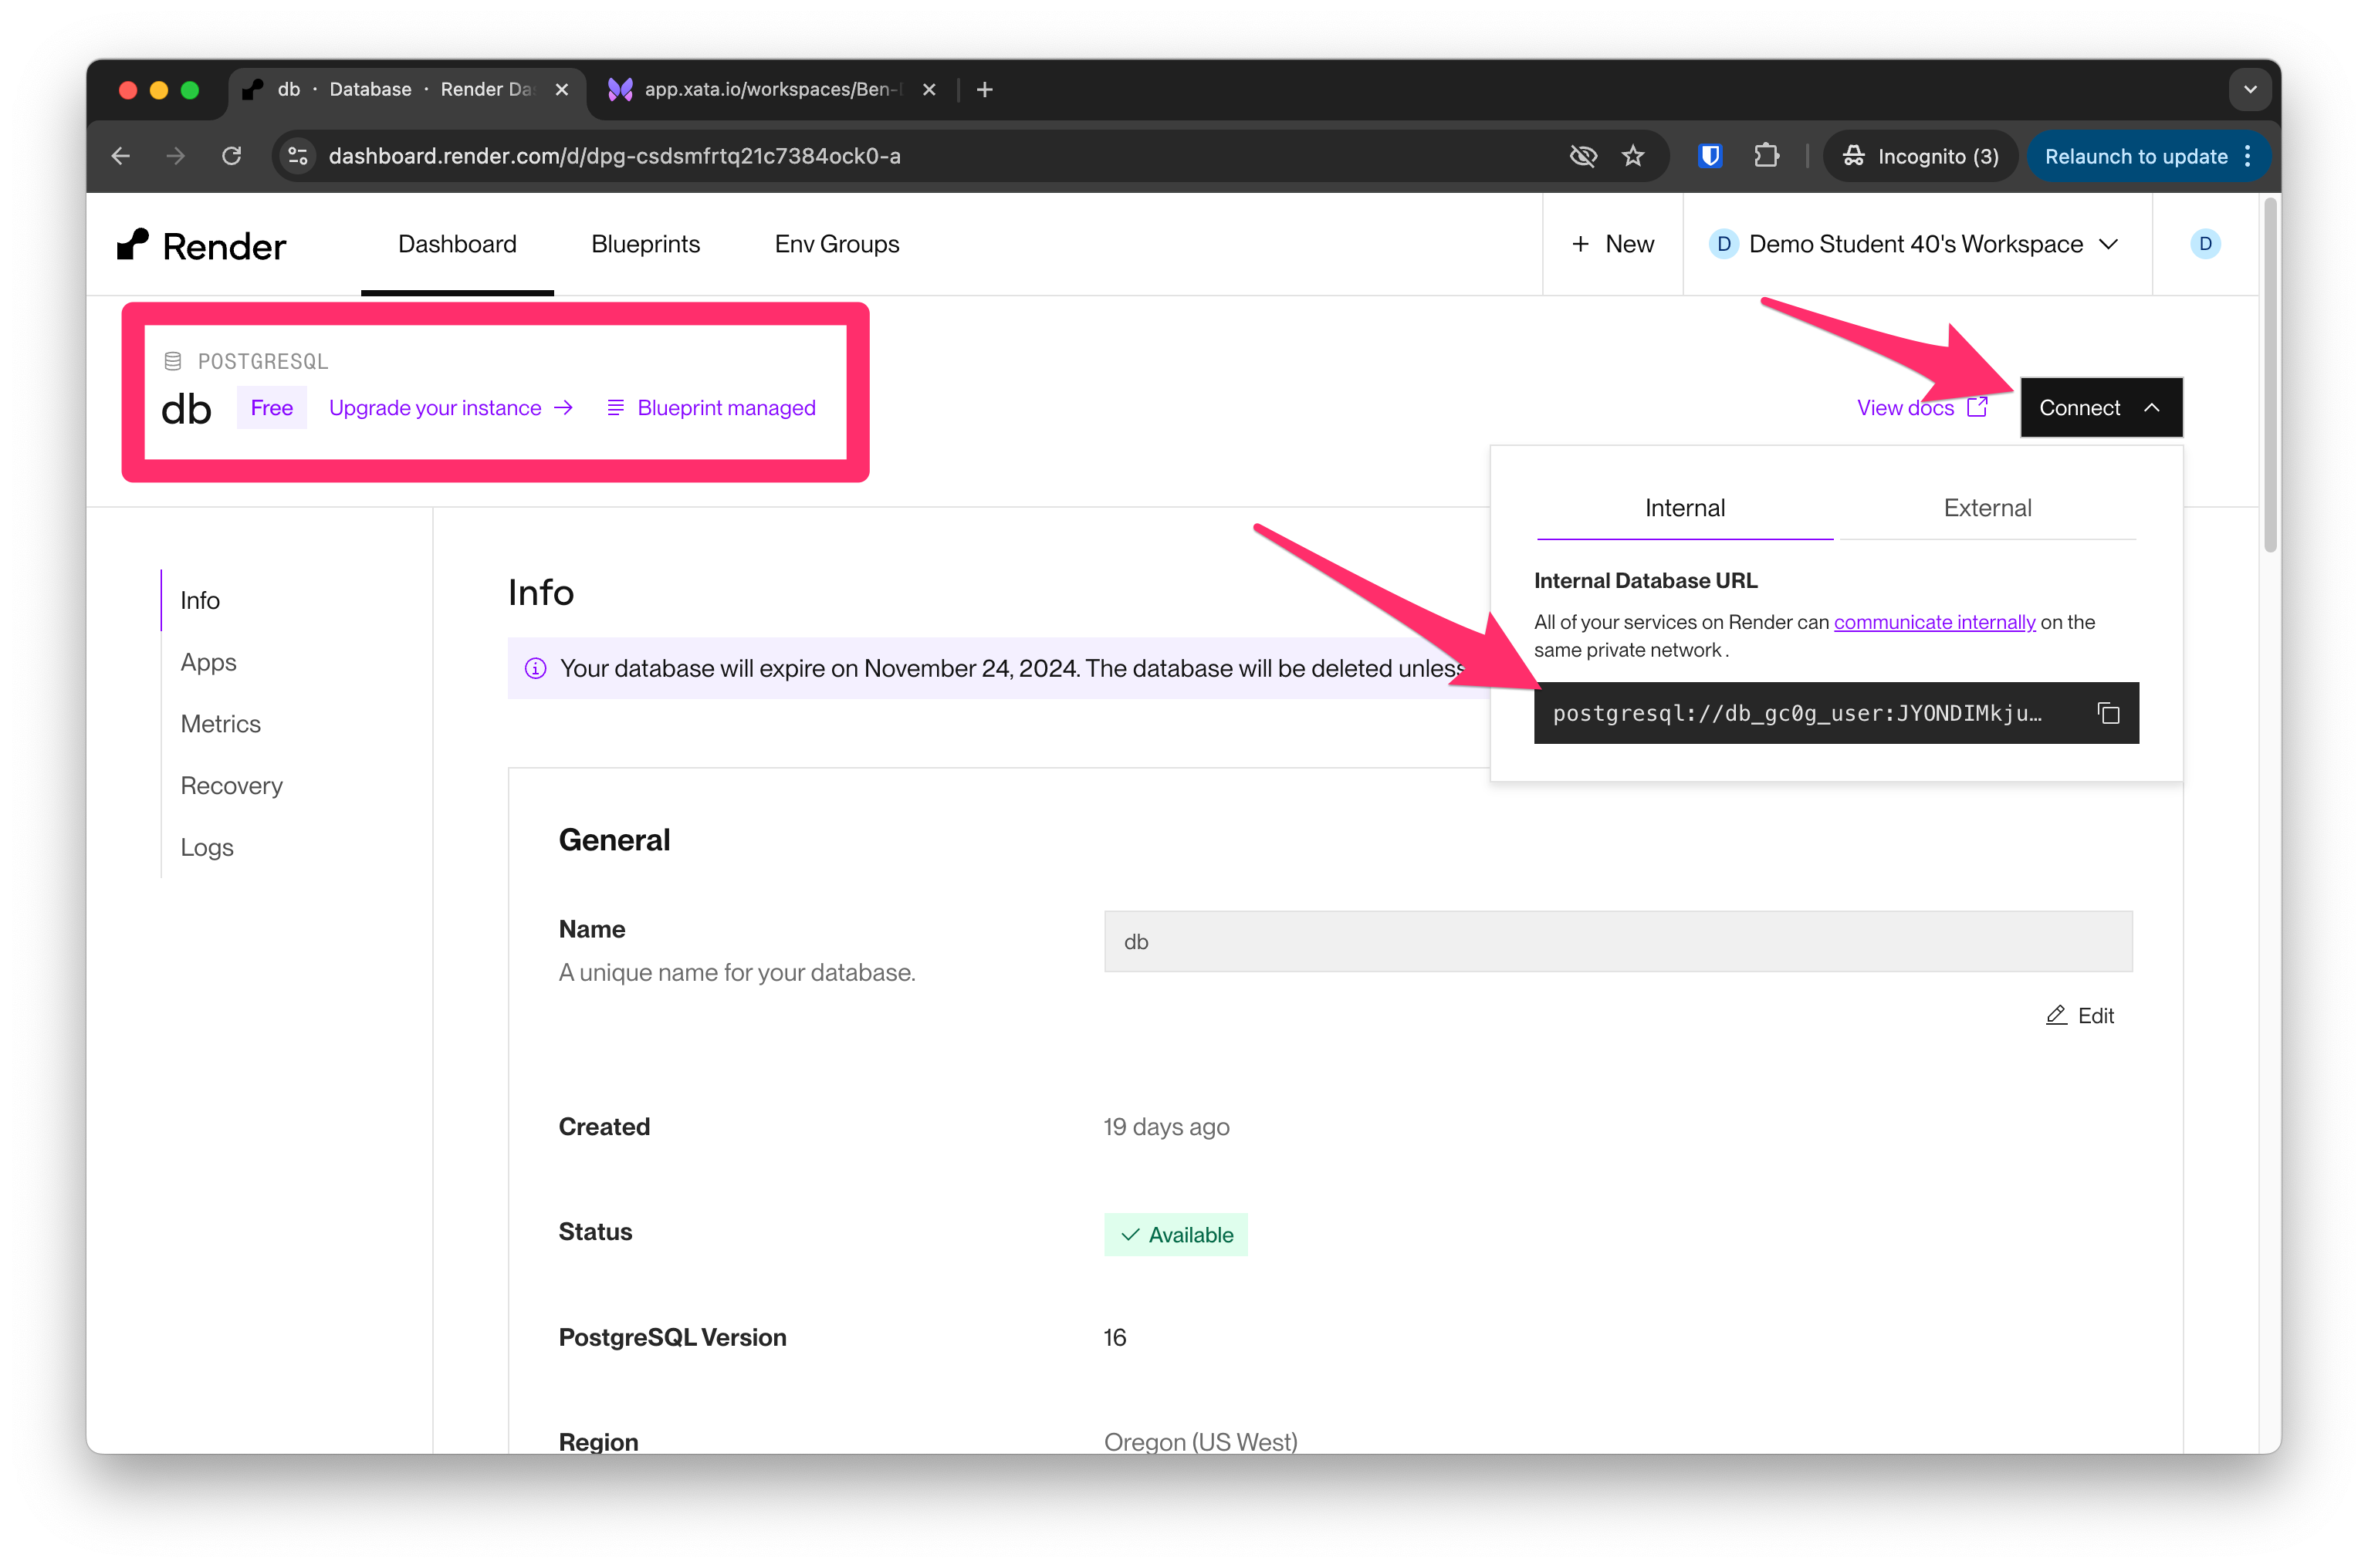
This URL is used in the environment variables on the separate web service to connect your deployed app to this database at the provided URL there!
Want to see?
Navigate to the dashboard page for your web service now, and click the “Environment” tab. If you click the “Show” button for the DATABASE_URL environment variable, you’ll see that “Internal Database URL” value!
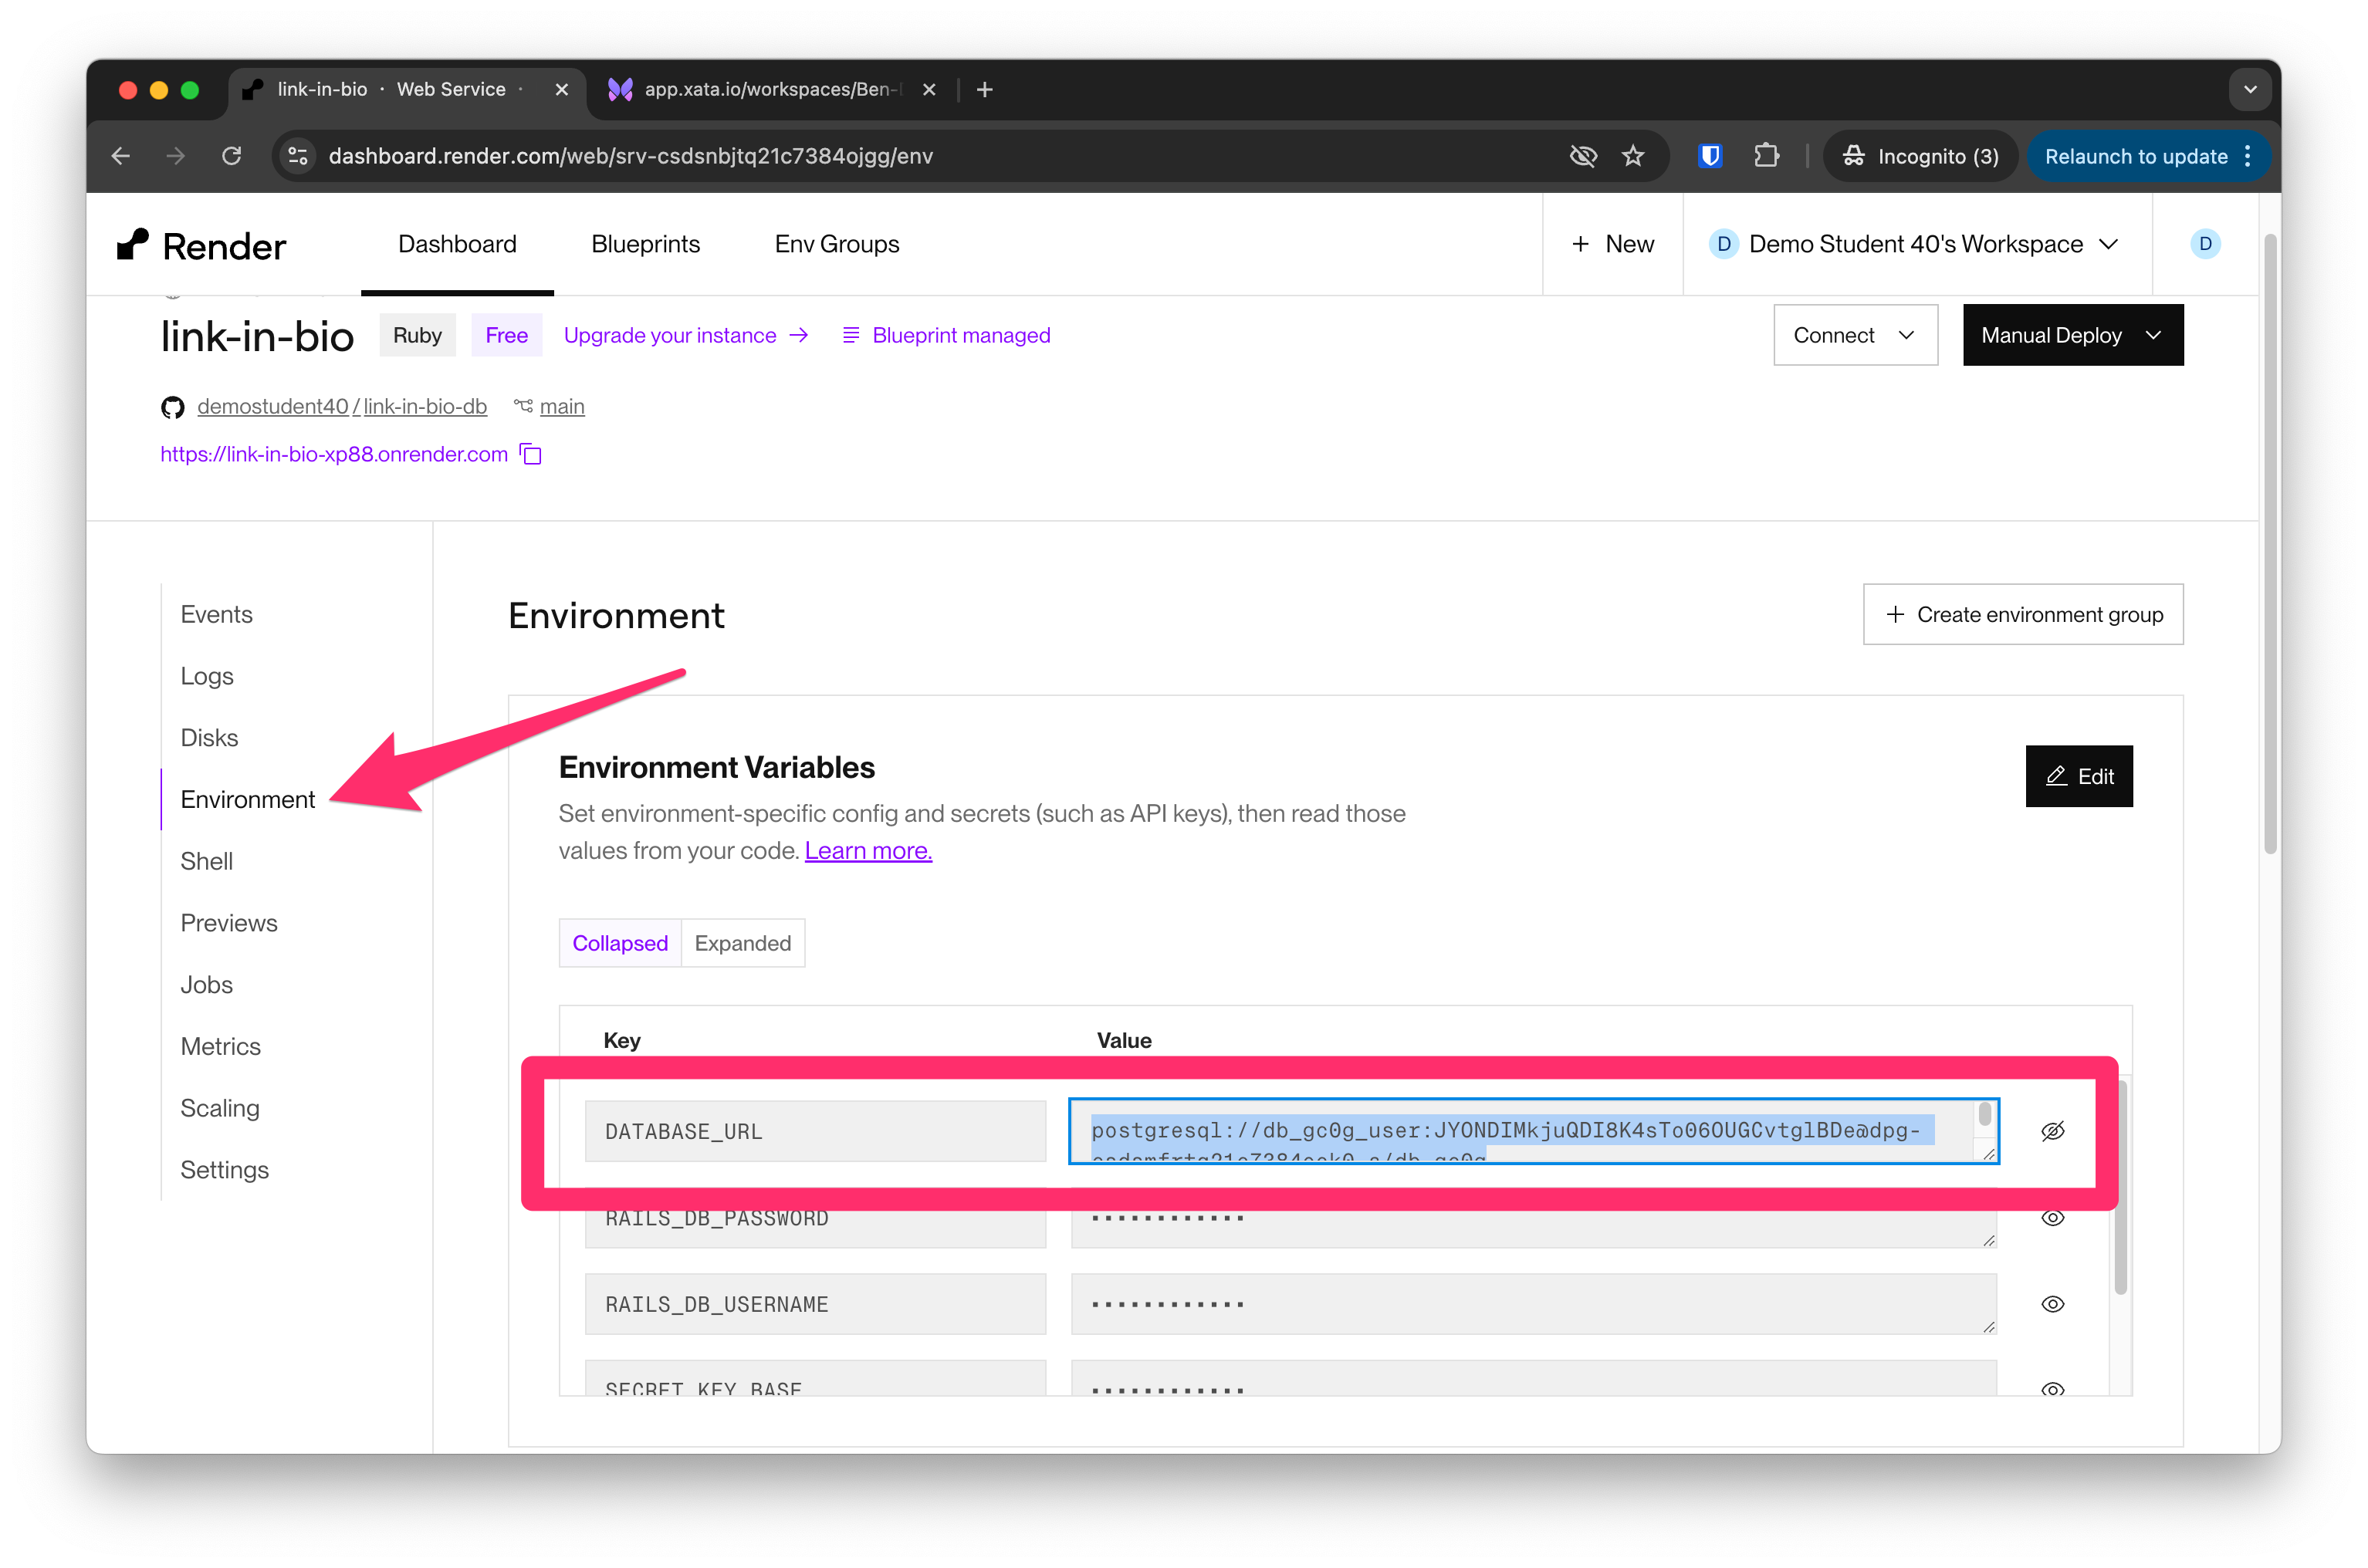
Great! So we now see that the web service just needs a change in that environment variable to connect to a different database, which will have its own unique URL. Let’s get a new database and URL now.
Neon offering
Neon is a SaaS company specializing in Postgres databases. Thankfully for us, they offer a generous free tier, which is sufficient for your portfolio projects.
When you first set up your Render Blueprint, you created a Postgres database instance on Render, and connected your Web Service (the Rails app itself) to that database. Using Neon, we will migrate our database to this new service and connect our Web Service to that external database, instead of the one provided by Render.
Connecting a Neon database to your Render web service
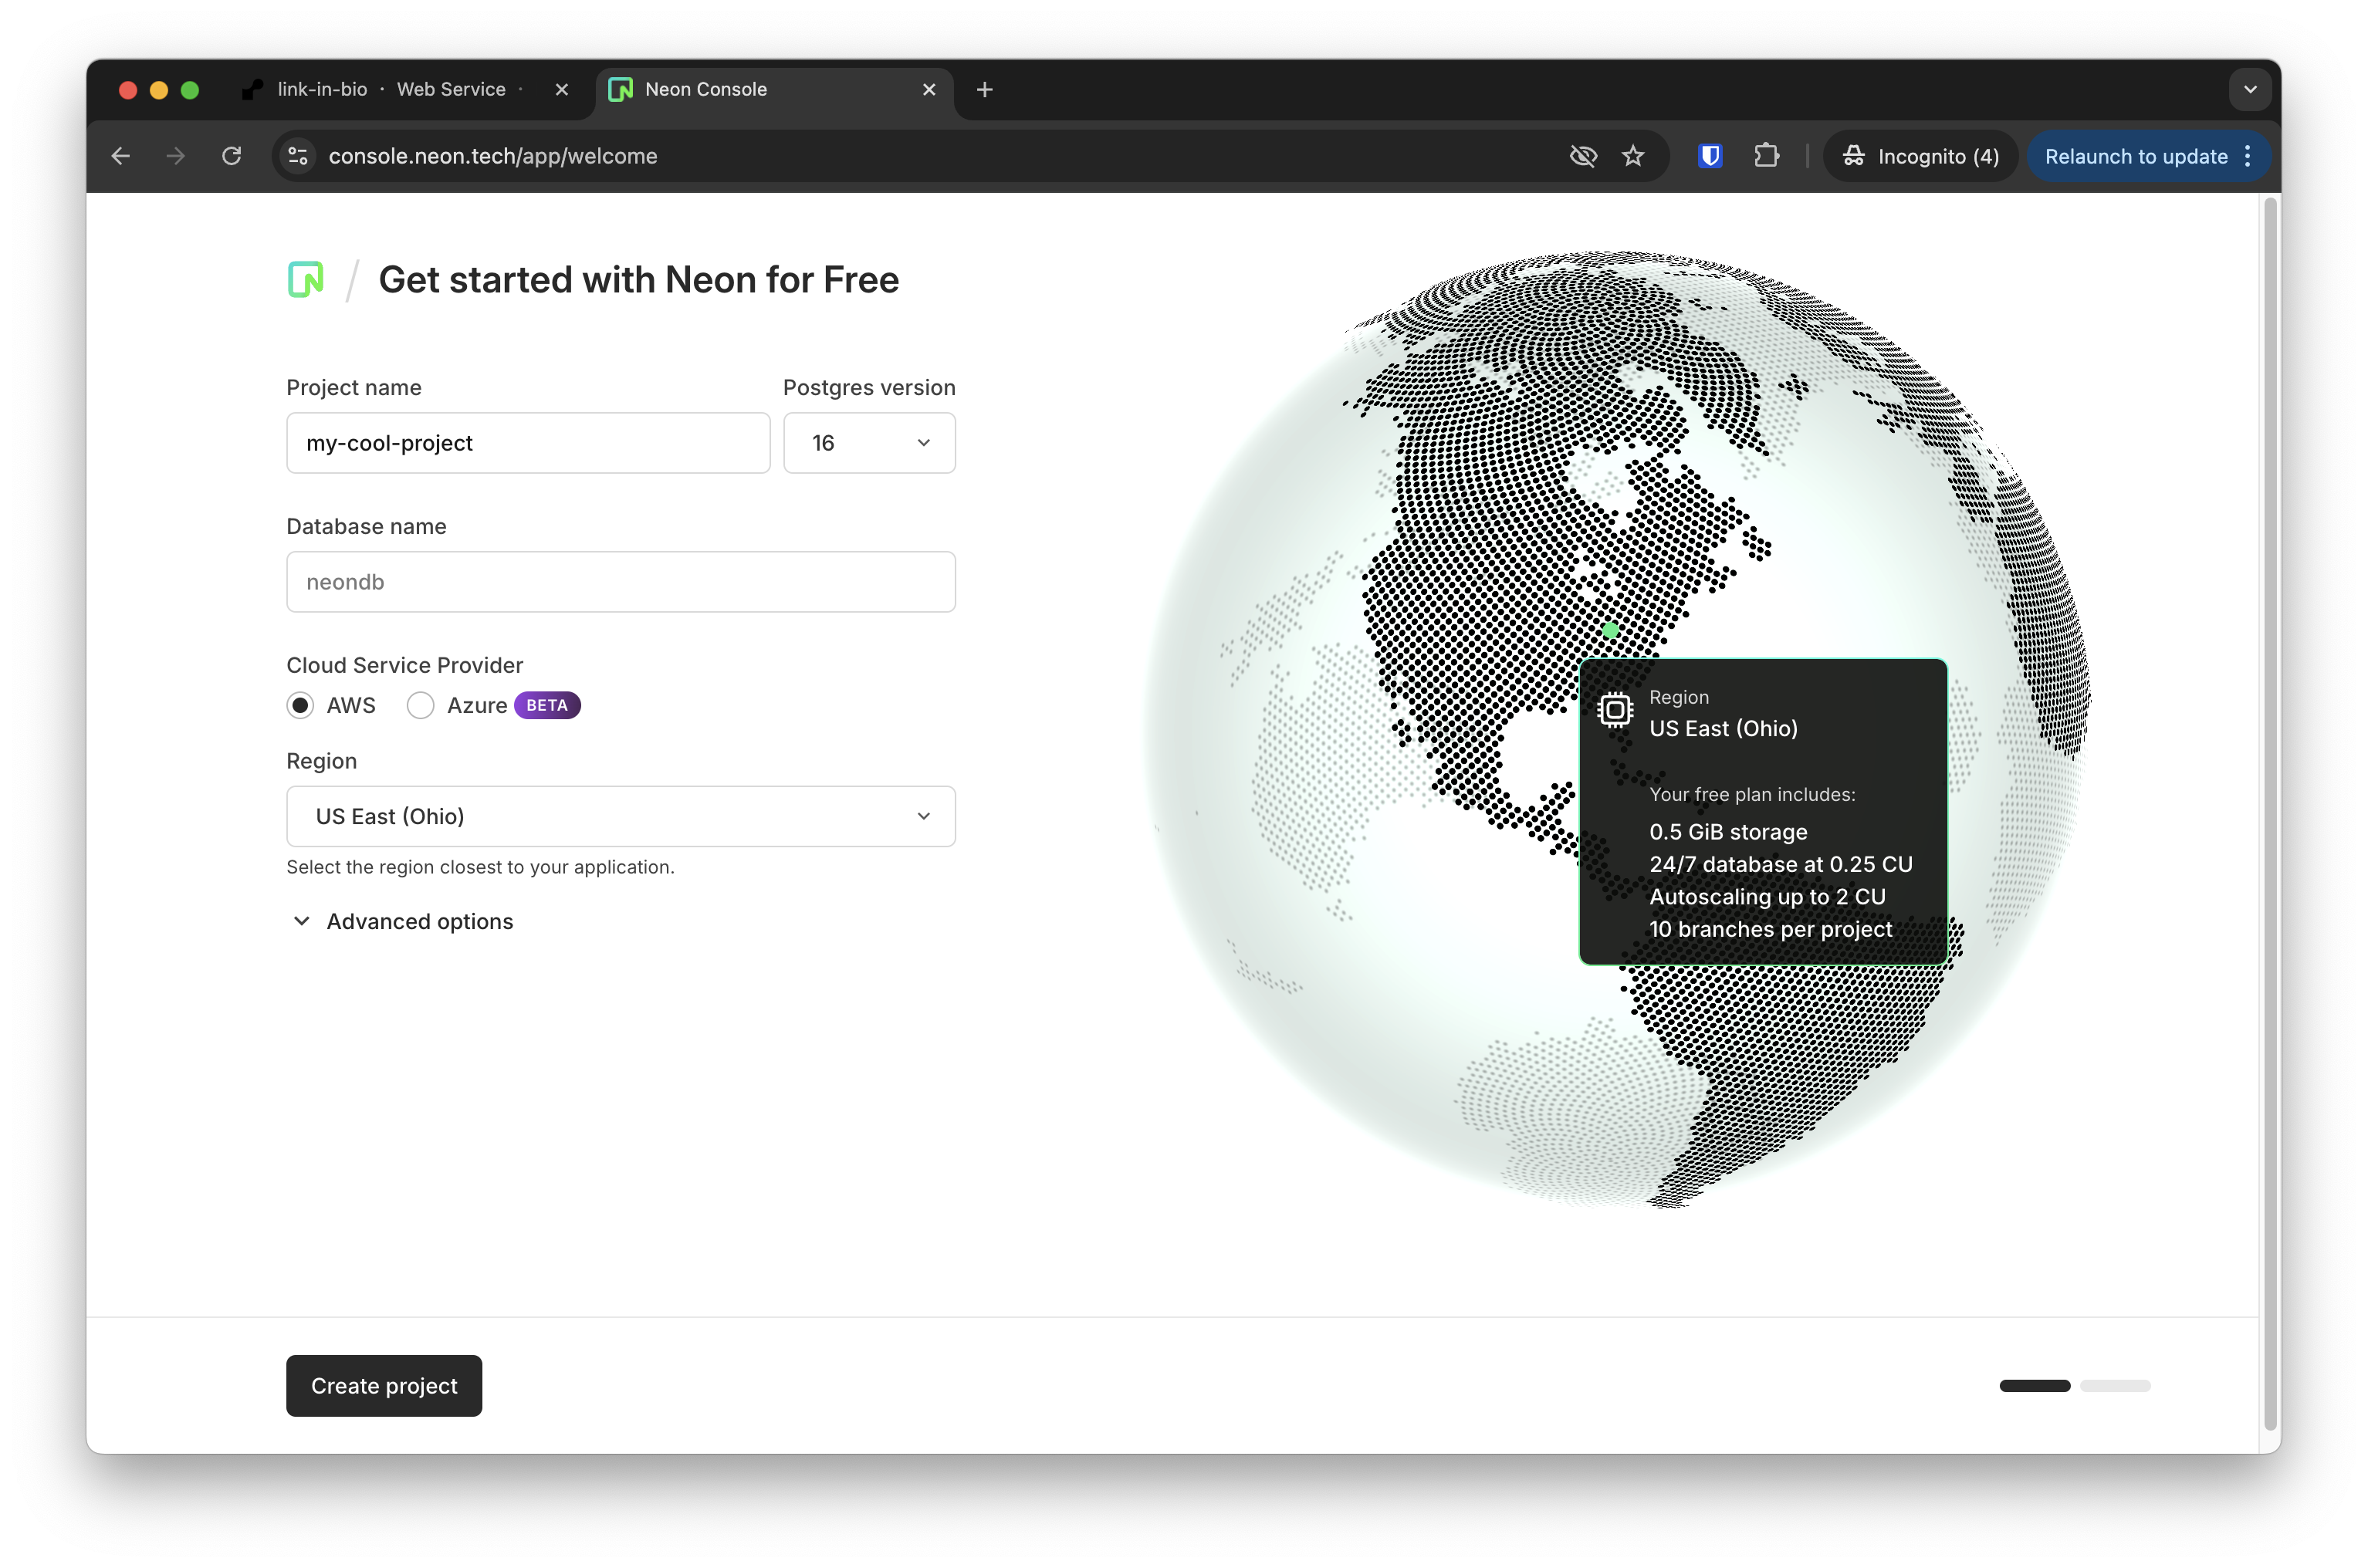
As a first step, sign up for Neon with your GitHub account.
On the screen that appears after sign up, fill in a name for your project, leave the default database name (neondb, or you can change it as you wish), and choose a database location (likely you can leave this as the default; or try to select one nearest to you), then click “Create project”:
On the next screen to “Configure autoscaling”, you can leave the default settings, and click “Confirm”. That will bring you to your dashboard page for your new database:
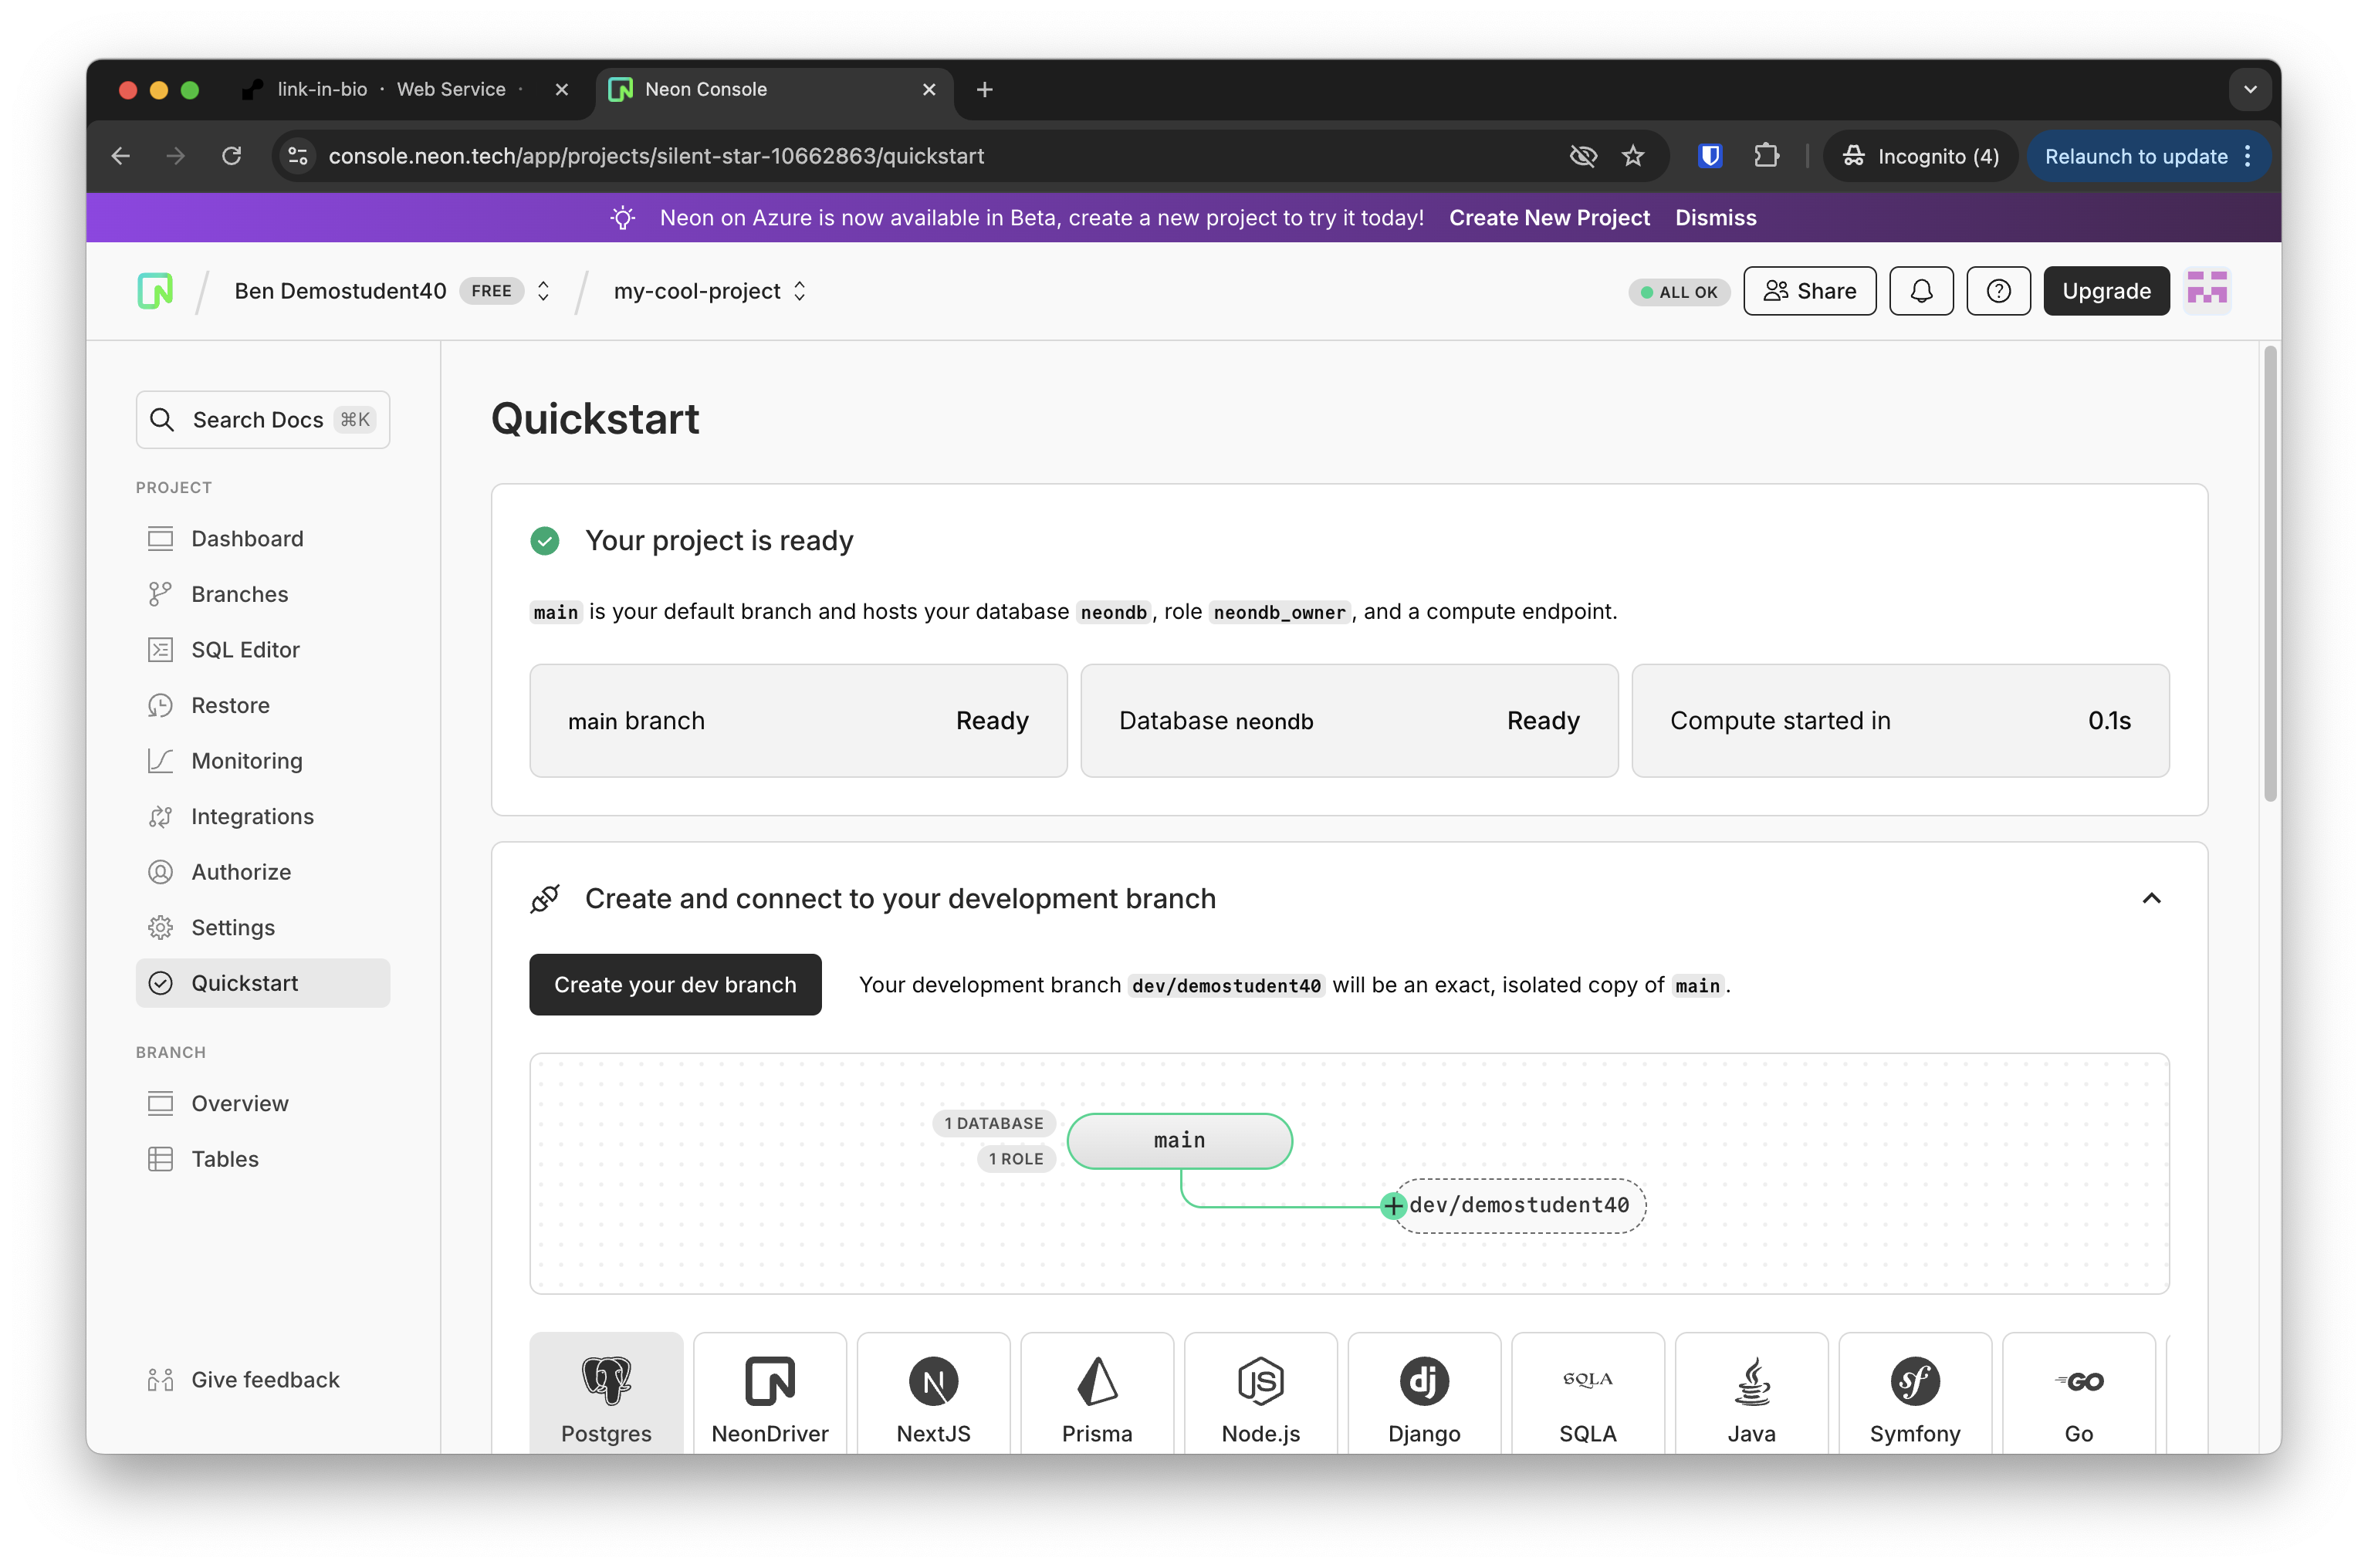
Scroll down the page a bit and find the URL for your database, and copy it to your clipboard:
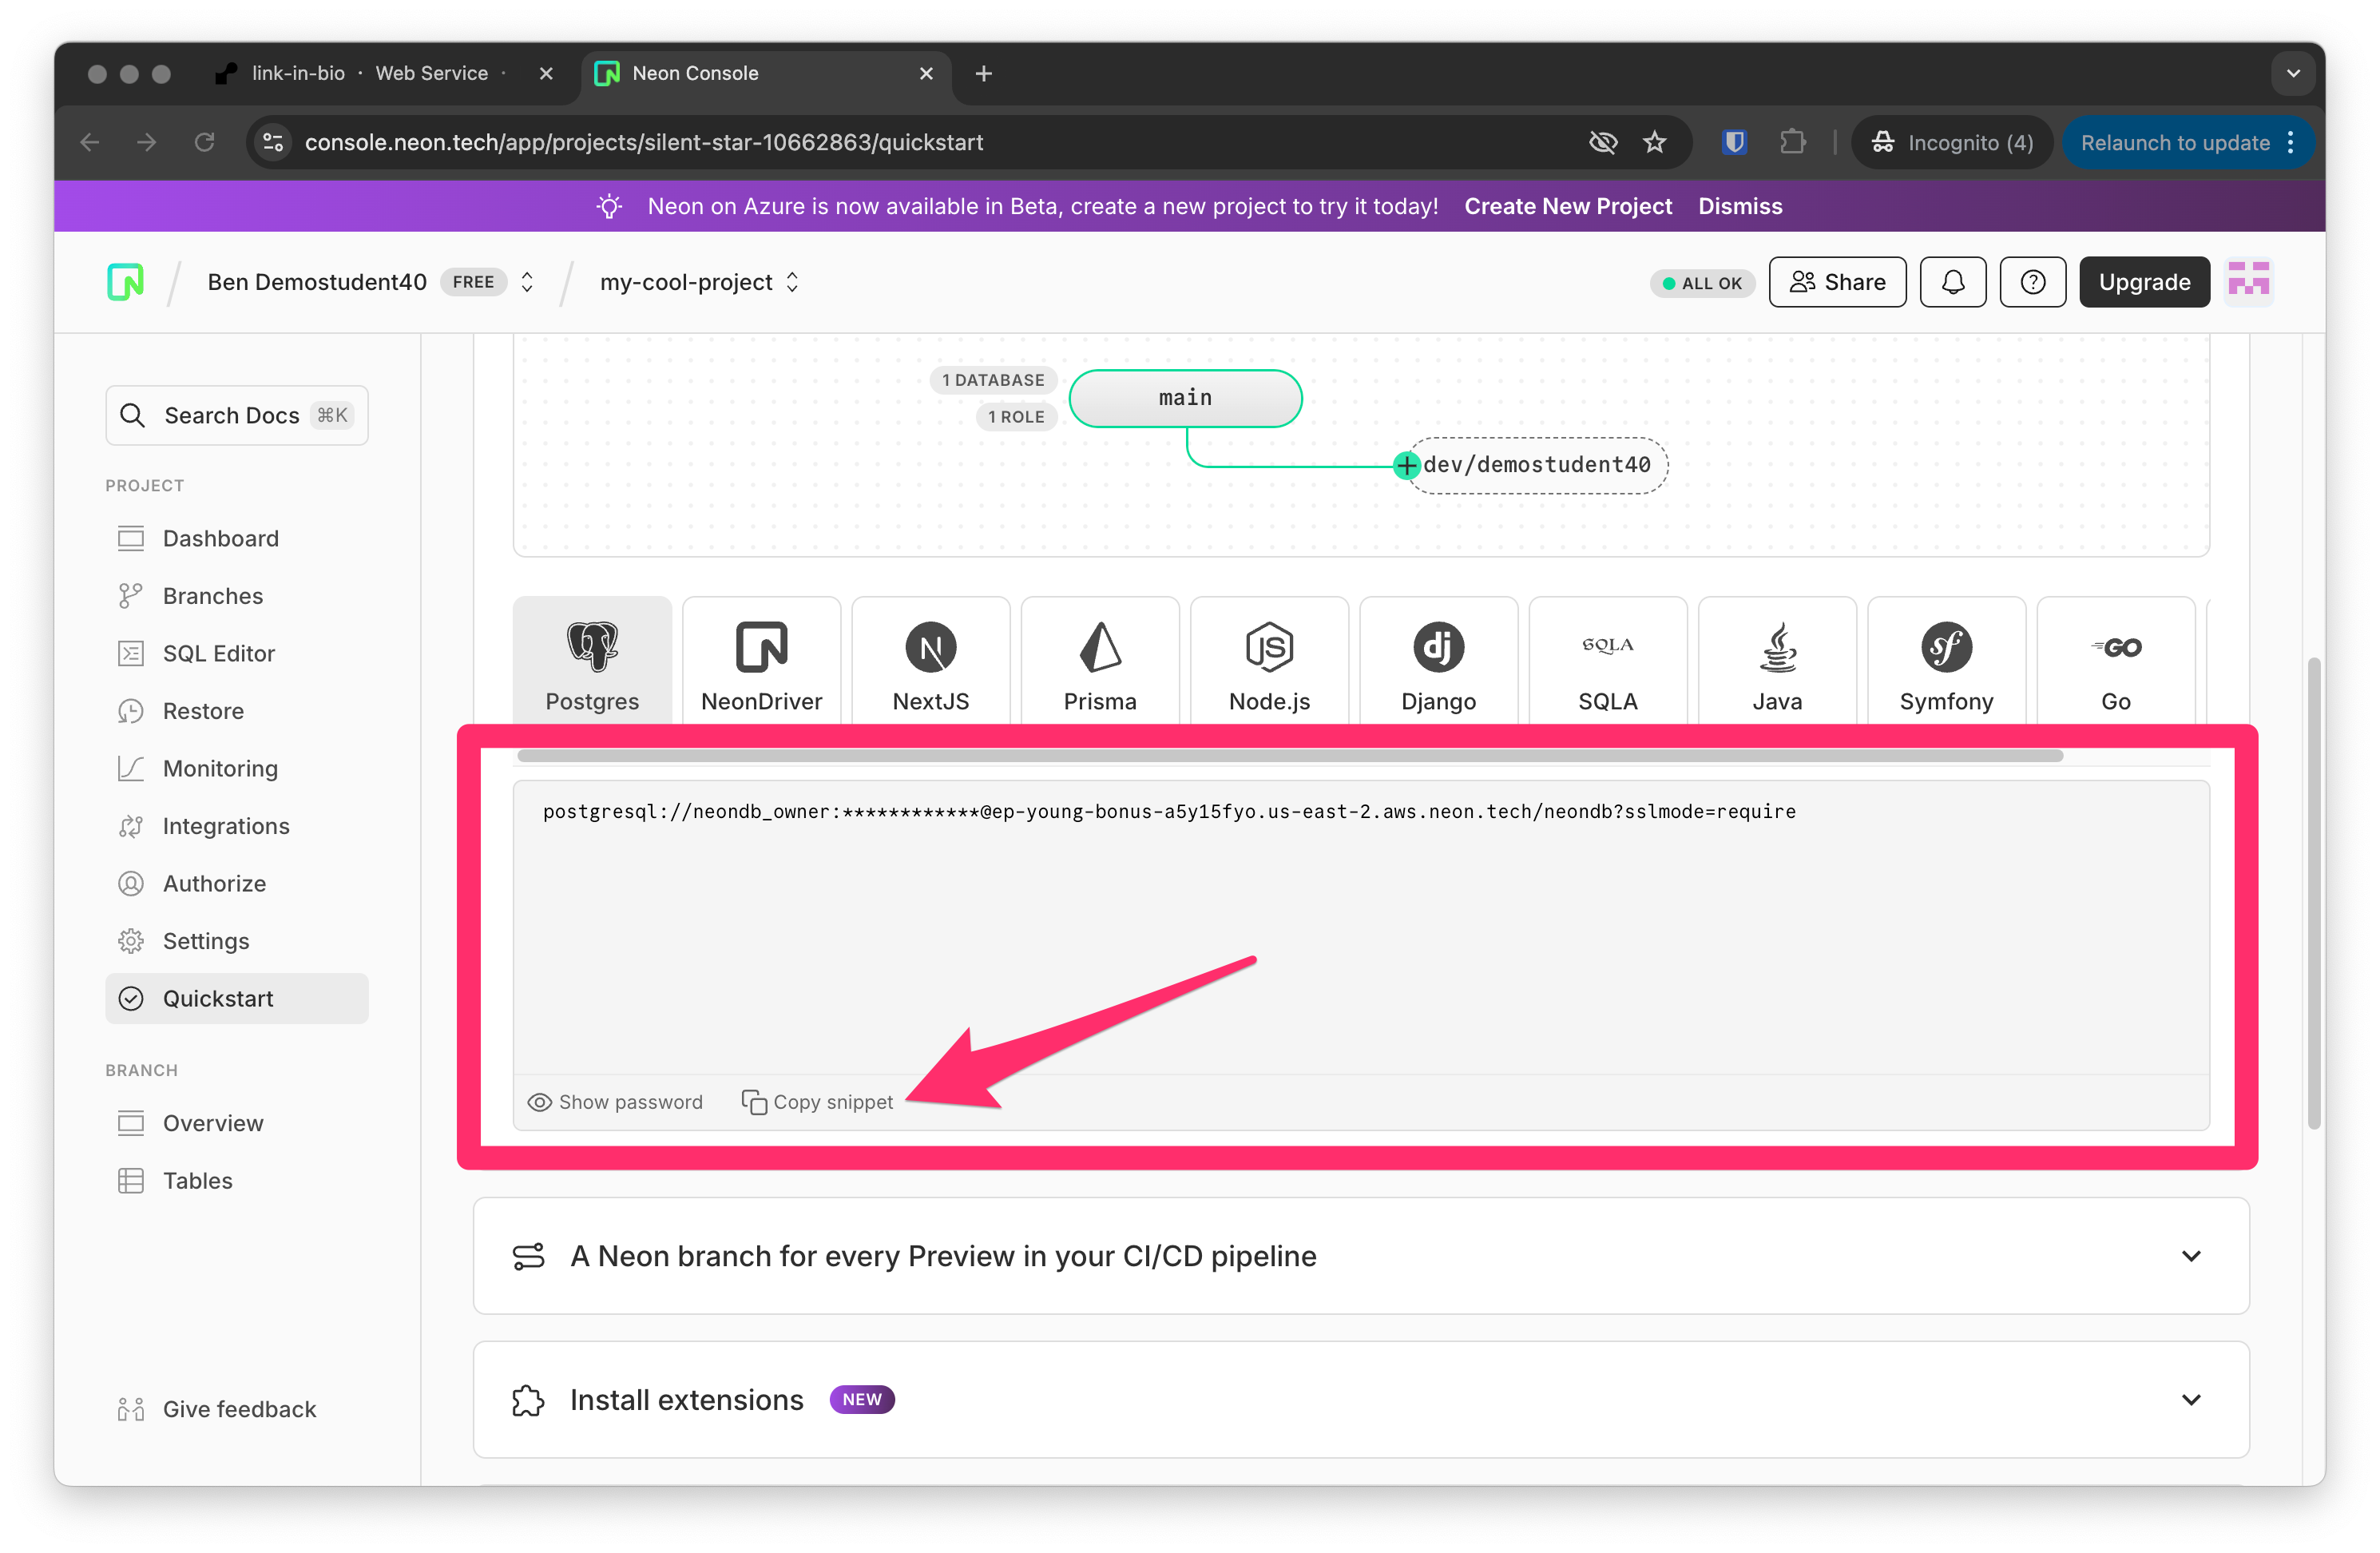
It looks something like this:
1
postgresql://xxxxx:*****@yyyyy.neon.tech/zzzzz
The format of that is standard for database connections and breaks down to:
1
postgresql:// [USERNAME] : [PASSWORD] @ [HOSTNAME] / [DATABASE_NAME]
Once you have that URL copied to your clipboard, you can head to your Render dashboard, and find the web service you wish to connect the external database. On the dashboard for your app, click on “Environment” and note the DATABASE_URL:
-
Click the “Edit” button
-
Click the “Value” field for
DATABASE_URL -
Replace the current value with the URL you copied from Neon
-
Click “Save, rebuild, and deploy”
When your app finishes deploying, try and visit the deployed URL. You will see that there are no records yet, since we just connected a blank, brand new database.
If the records in the previous Render database weren’t important to you, then you can leave things as they are and be done! However, if you’d like to restore your previous database records to your new, empty database, then read on.
Restoring your previous Render database records to your new Neon database
Your database and contents were not deleted by that DATABASE_URL environment variable exchange step, you only exchanged the connection to the database!
Because we still have that Render database service, we can extract the records from it and add them to our new Neon database. We’ll largely crib from Neon’s official guide on migrating a database from Render below, but we need to make some modifications to our codespace to run the commands.
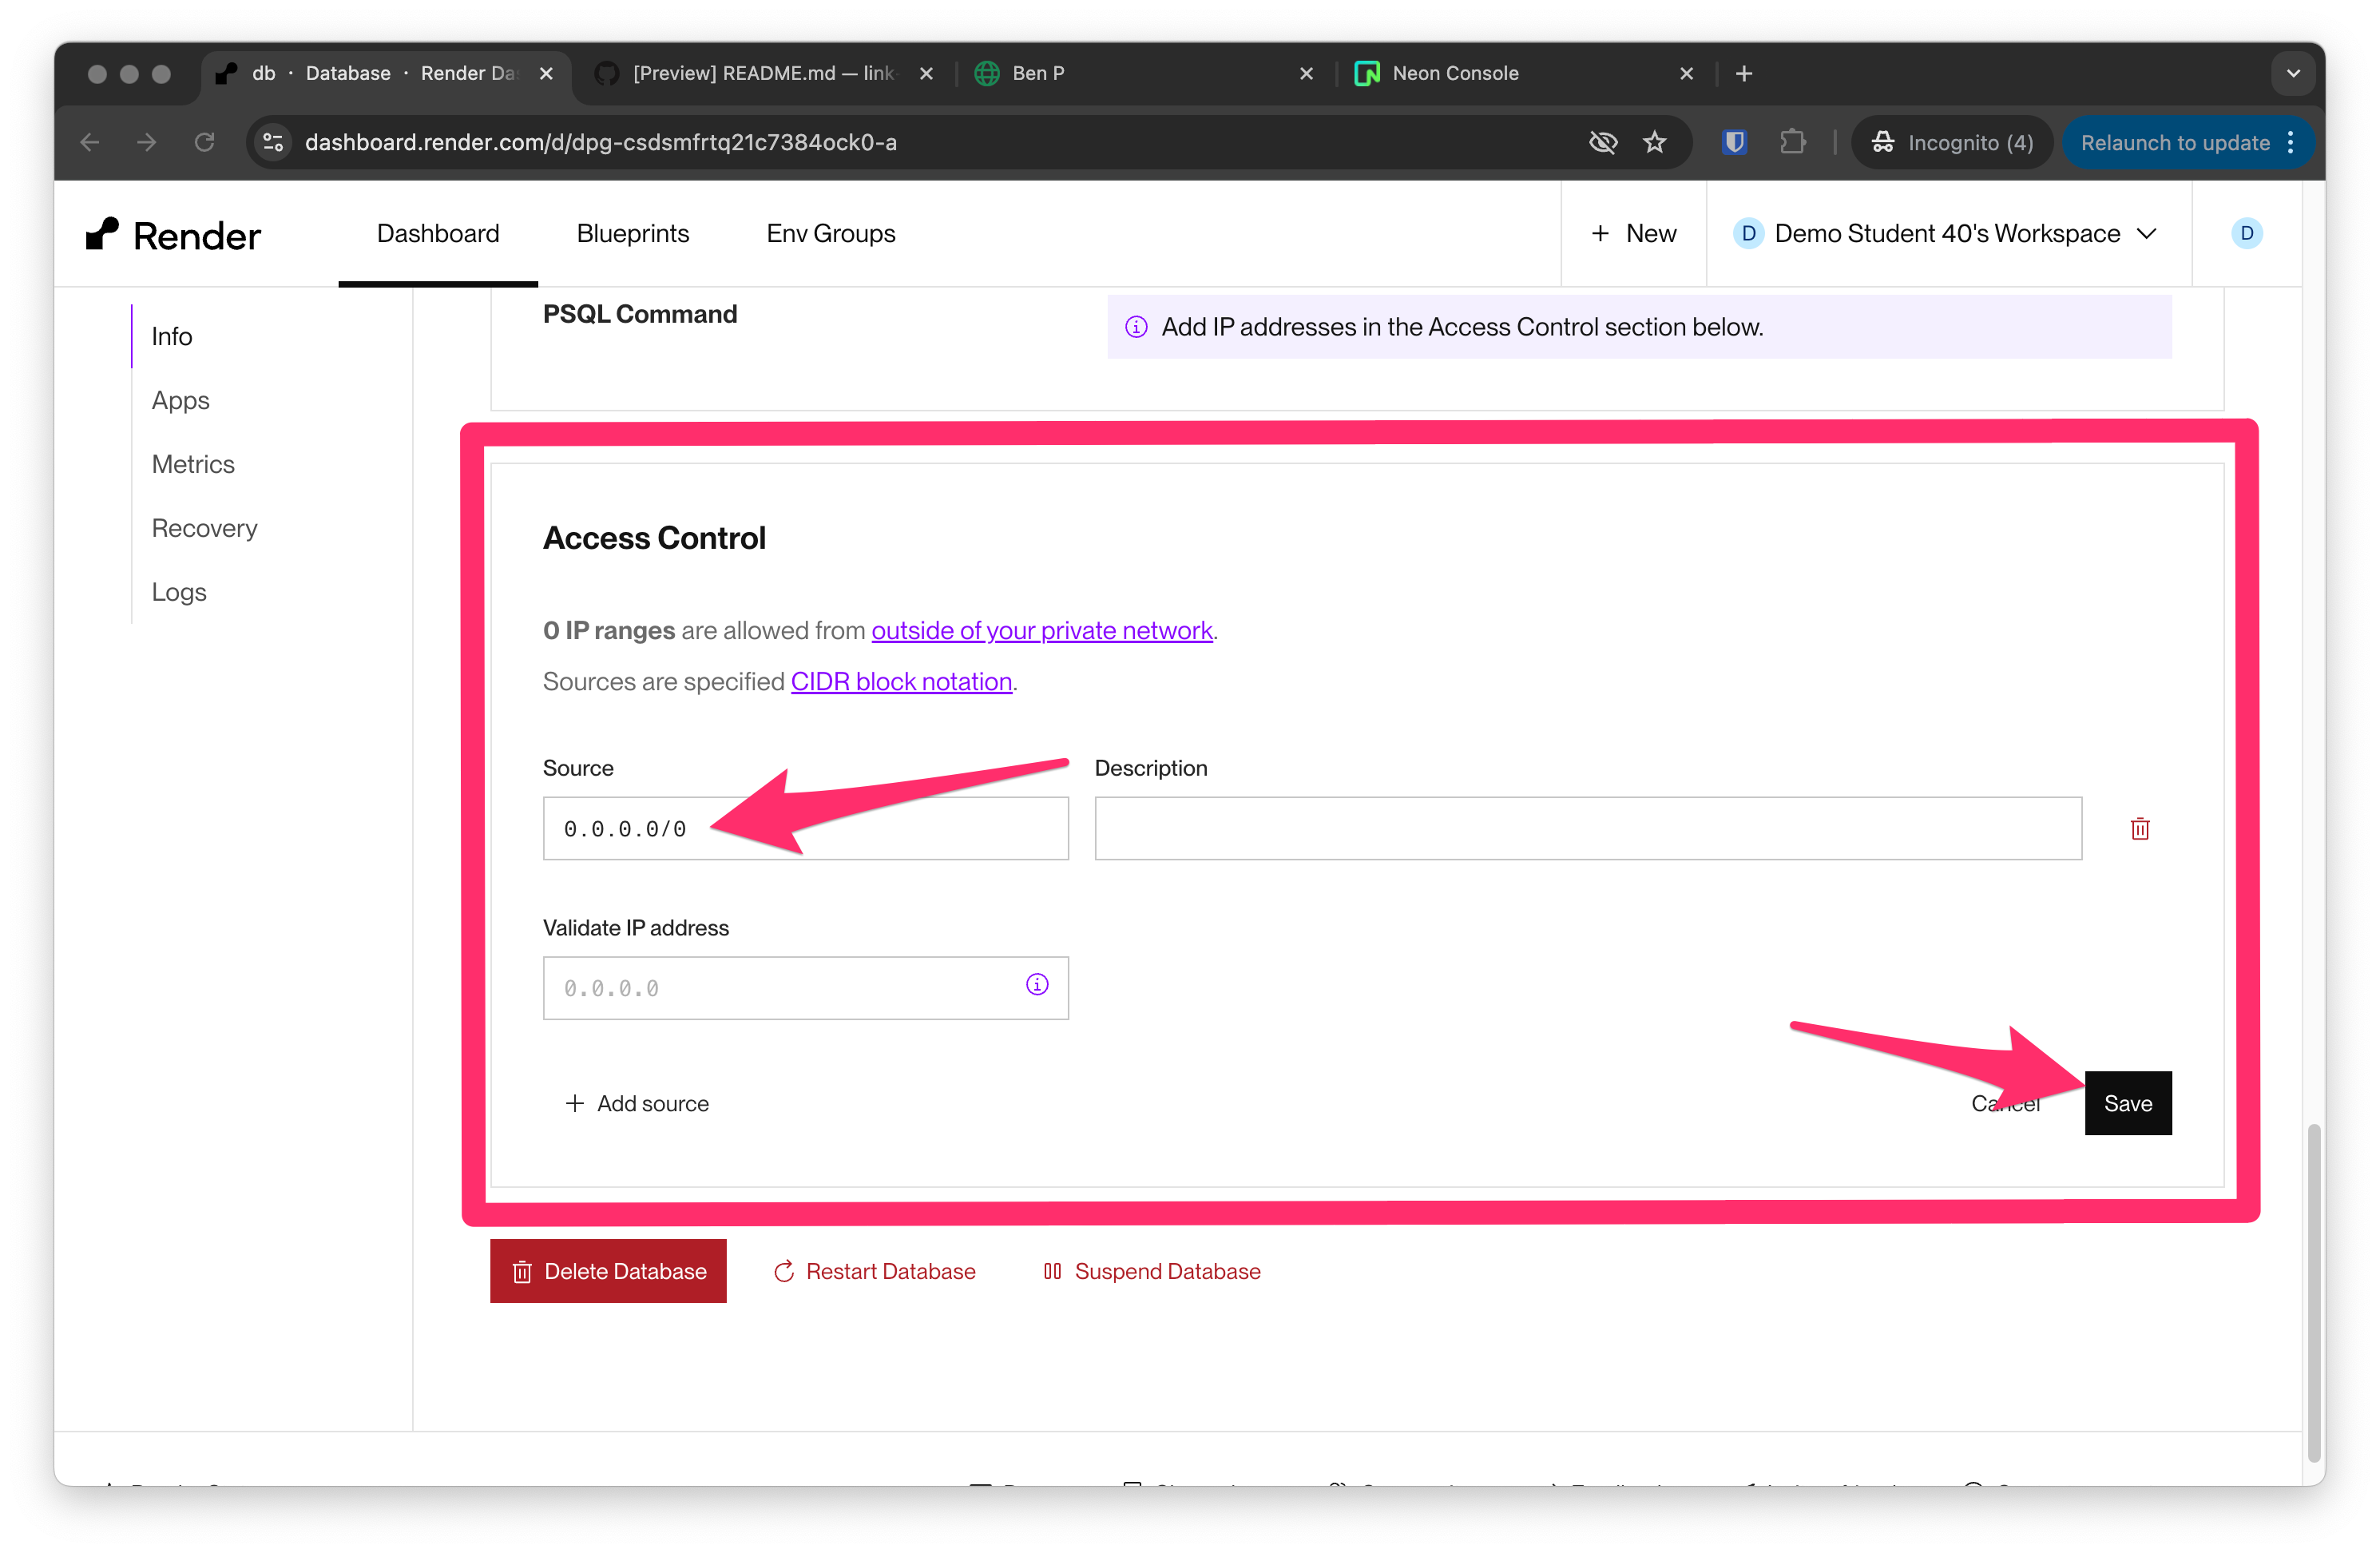
First, go to your Render dashboard page for the database service (not the web service), and scroll down to the “Access Control” section, where you can click on “+ Add source” to add a new IP address to allow external connections. Fill that in with:
1
0.0.0.0/0
and click “Save”.
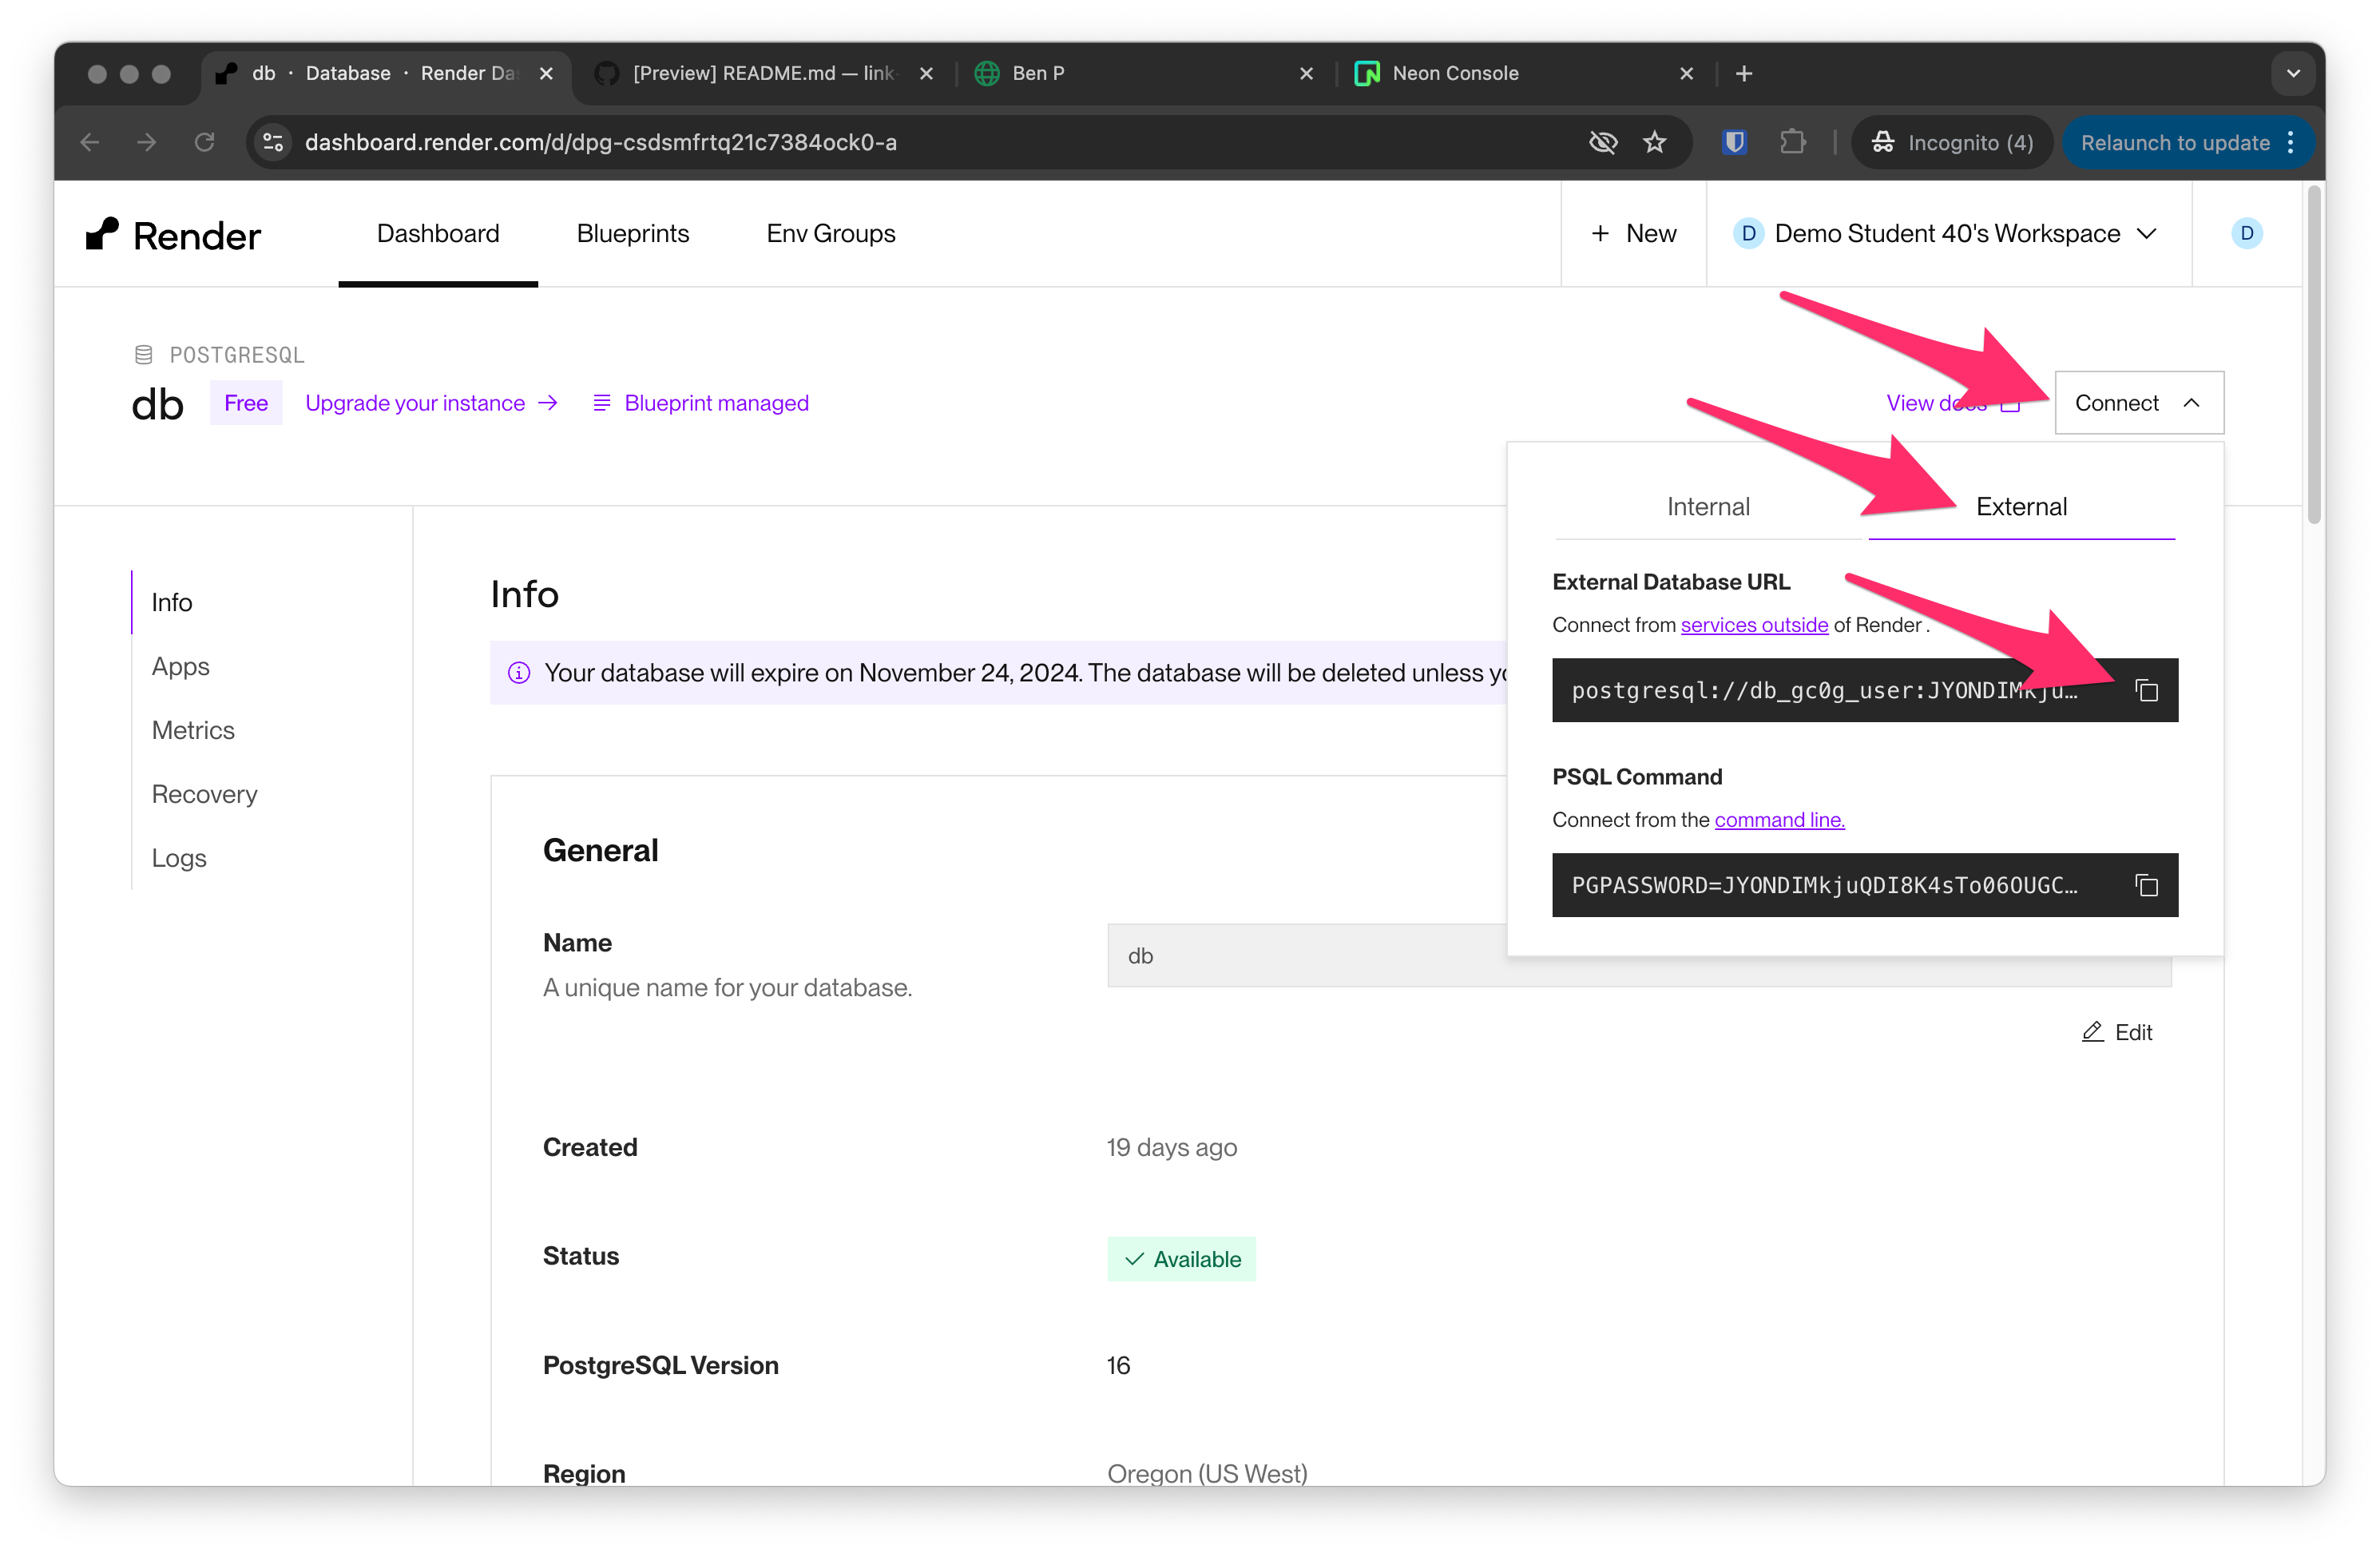
Once you do that, scroll back up the page and click on the “Connect” drop down and then the “External” tab, you will see an “External Database URL” value. We will need that value in the next steps:
Open a fresh codespace on your project’s GitHub repository. Do not use an existing codespace. We will be modifying some environment settings to get these next commands to work. When you are done with the steps here you can navigate to github.com/codespaces and delete the temporary codespace we are using for just these migration steps.
We will use our codespace since we already configured them with the pg_dump and pg_restore tools that we’ll need in the next steps: no need to install these locally on your own laptop!
Once your codespace is open, run the following command at the terminal, replacing the <render-database-hostname> with the value from your Render external database URL:
1
export PGHOST=<render-database-hostname>
For instance, given my full Render external database URL, with the hostname contained between the @ symbol and the last /:
1
postgresql://db_qygp_user:tOH6nwMmtXfxtLsHVbnJe3teU86h91ok@dpg-csr3o356l47c73d6fag0-a.oregon-postgres.render.com/db_qygp
I would run:
1
export PGHOST=dpg-csr3o356l47c73d6fag0-a.oregon-postgres.render.com
After you run that command, replacing the <render-database-hostname> with the value from your Render external database URL, run the following command at the terminal:
1
unset PGHOSTADDR
Now that we configured our codespace’s environment, we’re all set to dump and restore!
Before you run the next command, replace the <render-external-database-url> with the full value from the “External Database URL” value from the “Connect” drop down on your Render dashboard:
1
pg_dump -Fc -v -d <render-external-database-url> --schema=public -f render_dump.bak
For instance, I would run:
1
pg_dump -Fc -v -d postgresql://db_qygp_user:tOH6nwMmtXfxtLsHVbnJe3teU86h91ok@dpg-csr3o356l47c73d6fag0-a.oregon-postgres.render.com/db_qygp --schema=public -f render_dump.bak
That command will create a new file render_dump.bak in your codespace. Do not commit this file to your GitHub repository! We will delete the file once we finish the next step.
To restore the contents of your Render database to your Neon database, run the following command, replacing the <neon-connection-string> with the full value from your Neon database dashboard, that we used above to replace the DATABASE_URL environment variable on your Render app:
1
pg_restore -d <neon-connection-string> -v --no-owner --no-acl render_dump.bak
For instance, I would run:
1
pg_restore -d postgresql://neondb_owner:****@***.neon.tech/neondb?sslmode=require -v --no-owner --no-acl render_dump.bak
And that’s it! Visit your Render deployed URL and you should see the previously empty Neon database populated with the same data as your previous Render database!
Now you can delete the render_dump.bak file from your codespace, and, because we made those environment modifications to the codespace, you can delete the codespace itself as well at github.com/codespaces.
You can monitor your new database on your Neon project’s dashboard. And, if everything looks good, you can delete the Render database service now as well.
Assessment Details
Review your overall progress for this lesson
| Assessment Title | Earned Points | Current Progress | Assessment Points |
|---|---|---|---|
| Totals | 0 | 0% | 0 |